1. opencv-core
1.1. opencv数据结构和基本绘图
- 容器Mat的用法
- 基础绘图操作
- 常用数据结构
- opencv的多种格式化输出操作
1.1.1. Mat类
OpenCV从2.0版本开始使用Mat作为图像存储类。
1.1.1.1. Mat复制
Mat类有自动管理内存的功能 Mat类由矩阵头和指向存储像素的矩阵的指针组成,它的赋值运算符和拷贝构造函数在复制对象时只会复制矩阵头和矩阵指针,不会复制矩阵,保证了高效率。
如果需要复制矩阵本身,可以使用函数clone()或copyTo()。
1.1.1.2. 显示创建Mat实例
- 构造函数
 #include<opencv2/opencv.hpp>
 using namespace cv;
 int main()
 {
     Mat mat(2, 2,CV_8UC3, Scalar(0, 0, 255));
     std::cout << mat;
     std::cin.get();
 }
[ 0, 0, 255, 0, 0, 255; 0, 0, 255, 0, 0, 255]
1.1.2. 格式化输出
#include<opencv2/opencv.hpp>

using namespace cv;

int main()
{
	Point2f p1(1.1, 2);
	std::cout << "p1="<<p1<<std::endl;

	Point3f p2(8, 2, 1);
	std::cout << "p2=" << p2<<std::endl;
	//基于Mat的vector
	std::vector<float> v;
	v.push_back(1);
	v.push_back(3);
	v.push_back(5);
	std::cout << "Mat(v)=" << Mat(v) << std::endl;

	//存放Point的vector
	std::vector<Point2f> pointsV(20);
	for (size_t i = 0; i < pointsV.size(); i++)
	{
		pointsV[i] = Point2f((float)(i * 5), (float)(i % 7));
	}
	std::cout << "pointsV=" << pointsV;
	std::cin.get();
}
p1=[1.1, 2] p2=[8, 2, 1] Mat(v)=[1; 3; 5] pointsV=[0, 0; 5, 1; 10, 2; 15, 3; 20, 4; 25, 5; 30, 6; 35, 0; 40, 1; 45, 2; 50, 3; 55, 4; 60, 5; 65, 6; 70, 0; 75, 1; 80, 2; 85, 3; 90, 4; 95, 5]
1.1.3. 其他基础数据结构
1.1.3.1. 点的表示-Point
1.1.3.2. 颜色表示-Scalar
Scalar表示具有4个元素的数组,被大量用于传递像素值,且Scalar是Vec4x的一个变种。
Scalar(a,b,c):表示红色r分量为c,绿色g分量为b,蓝色b分量为a
1.1.3.3. 尺寸表示-Size
1.1.3.4. 矩形表示-Rect
成员:x、y、width、height 成员函数:
Size():返回Size对象area():返回矩形面积contains(Point p):判断点是否在矩形内inside(Rect):判断矩形是否在该矩形内tl():返回左上角坐标br():返回右下角坐标
Rect类对&和|操作符进行了重载,可以用在求两个矩形的交集和并集:
Rect rect=rect1 & rect2;
Rect rect=rect1 | rect2;
也可以对Rect进行平移和缩放操作:
Rect rectShift=rect+point
Rect rectScale=rect+size
1.1.4. 颜色空间转换
cvtColor( InputArray src, OutputArray dst, int code, int dstCn = 0)函数实现图像颜色空间的转换
/** @brief Converts an image from one color space to another.

The function converts an input image from one color space to another. In case of a transformation
to-from RGB color space, the order of the channels should be specified explicitly (RGB or BGR). Note
that the default color format in OpenCV is often referred to as RGB but it is actually BGR (the
bytes are reversed). So the first byte in a standard (24-bit) color image will be an 8-bit Blue
component, the second byte will be Green, and the third byte will be Red. The fourth, fifth, and
sixth bytes would then be the second pixel (Blue, then Green, then Red), and so on.

The conventional ranges for R, G, and B channel values are:
-   0 to 255 for CV_8U images
-   0 to 65535 for CV_16U images
-   0 to 1 for CV_32F images

In case of linear transformations, the range does not matter. But in case of a non-linear
transformation, an input RGB image should be normalized to the proper value range to get the correct
results, for example, for RGB \f$\rightarrow\f$ L\*u\*v\* transformation. For example, if you have a
32-bit floating-point image directly converted from an 8-bit image without any scaling, then it will
have the 0..255 value range instead of 0..1 assumed by the function. So, before calling #cvtColor ,
you need first to scale the image down:
@code
    img *= 1./255;
    cvtColor(img, img, COLOR_BGR2Luv);
@endcode
If you use #cvtColor with 8-bit images, the conversion will have some information lost. For many
applications, this will not be noticeable but it is recommended to use 32-bit images in applications
that need the full range of colors or that convert an image before an operation and then convert
back.

If conversion adds the alpha channel, its value will set to the maximum of corresponding channel
range: 255 for CV_8U, 65535 for CV_16U, 1 for CV_32F.

@param src input image: 8-bit unsigned, 16-bit unsigned ( CV_16UC... ), or single-precision
floating-point.
@param dst output image of the same size and depth as src.
@param code color space conversion code (see #ColorConversionCodes).
@param dstCn number of channels in the destination image; if the parameter is 0, the number of the
channels is derived automatically from src and code.

@see @ref imgproc_color_conversions
 */
CV_EXPORTS_W void cvtColor( InputArray src, OutputArray dst, int code, int dstCn = 0 );
- src:源图像
- dst:目标图像
- code:转换标记,见
ColorConversionCodes - dstCn:目标图像的通道数量
#include<opencv2/opencv.hpp>
using namespace cv;

int main()
{
	Mat src = imread("E:\\temp\\2.jpg");
	Mat dst;

	cv::cvtColor(src, dst, COLOR_BGR2HSV);
	imshow("BGR2Lab", dst);
	std::cout<< cvFloor(1.2f);
	waitKey(0);
}
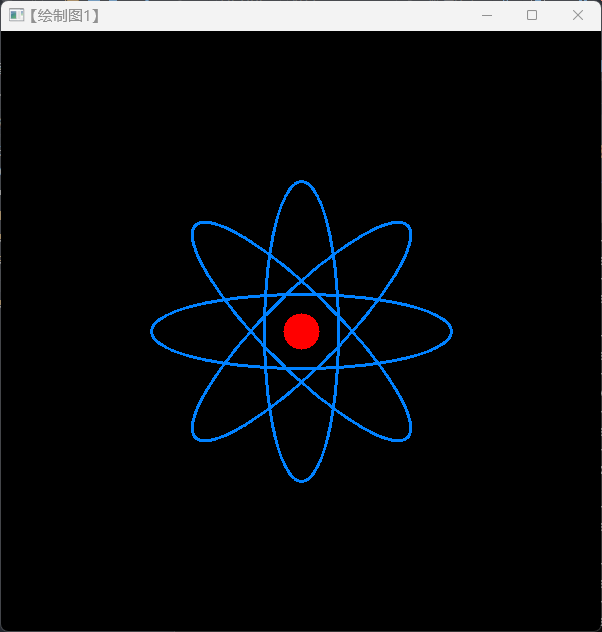
1.1.5. 基本图形的绘制
#include<opencv2/opencv.hpp>
using namespace cv;

#define WINDOW_WIDTH 600
void DrawEllipse(Mat img, double angle) {
	int thickness = 2;
	int lineType = LineTypes::LINE_8;
	ellipse(
		img,
		Point(WINDOW_WIDTH / 2, WINDOW_WIDTH / 2),
		Size(WINDOW_WIDTH / 4, WINDOW_WIDTH / 16),
		angle,
		0, 360,
		Scalar(255, 129, 0),
		thickness, lineType
	);
}
void DrawFilledCircle(Mat img, Point center)
{
	//这里thickness为-1导致绘制的实心圆
	int thickness = -1;

	int lineType = LineTypes::LINE_8;
	circle(
		img,
		center,
		WINDOW_WIDTH / 32,
		Scalar(0, 0, 255),
		thickness,
		lineType
	);
}


void DrawLine(Mat img, Point start, Point end)
{
	int thickness = 2;
	int lineType = 8;
	line(img, start, end, Scalar(0, 0, 0), thickness, lineType);
}


#define WINDOW_NAME1 "【绘制图1】"
#define WINDOW_NAME2 "【绘制图2】"
int main()
{
	Mat atomImage = Mat::zeros(WINDOW_WIDTH, WINDOW_WIDTH, CV_8UC3);
	DrawEllipse(atomImage, 90);
	DrawEllipse(atomImage, 0);
	DrawEllipse(atomImage, 45);
	DrawEllipse(atomImage, -45);

	DrawFilledCircle(atomImage, Point(WINDOW_WIDTH / 2, WINDOW_WIDTH / 2));
	imshow(WINDOW_NAME1, atomImage);
	waitKey(0);
}
效果: