- 1. Winform编程
1. Winform编程
1.1. Form
1.1.1. 基础概念
- 显示
WinForm的显示主要可以通过两种方法:
form1.Show()form1.ShowDialog()这两个方法的区别是Show()方法展示的窗口和调用者之间没有关系,而ShowDialog()会导致显示窗口和调用者之间存在Owner-Owned的关系。
1.1.2. Form生命周期
Form生命周期如下图所示:
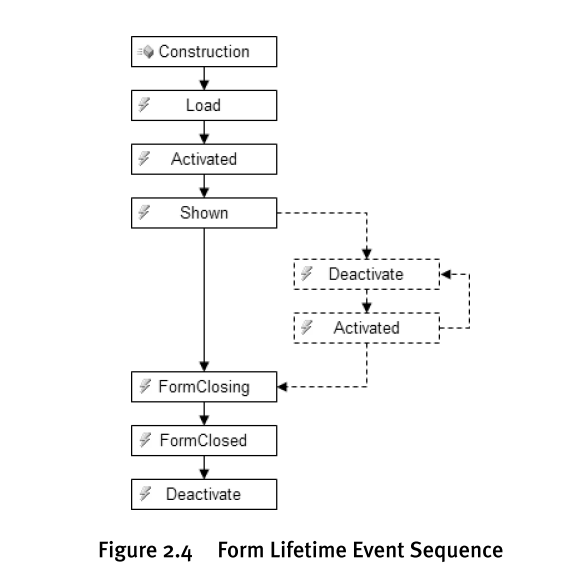
- FormClosing事件
FormClosing在窗口关闭(Close)之前发生,可以在处理事件方法中添加窗口关闭的确认提示:
 private void Form1_FormClosing(object sender, FormClosingEventArgs e)
 {
     DialogResult result = MessageBox.Show("退出系统?", "关闭提示", MessageBoxButtons.YesNo);
     e.Cancel = (result == DialogResult.No);
 }
此外,FormClosing也是保存form相关属性数据(比如size、location等)最合适的地方。
1.2. Dialog
1.3. Drawing
1.3.1. Graphics
bool drawEllipse = false;
        private void btnDrawing_Click(object sender, EventArgs e)
        {

            drawEllipse = !drawEllipse;
            using (Graphics g = this.CreateGraphics())
            {
                if (this.drawEllipse)
                {
                    // Draw the ellipse
                    g.FillEllipse(Brushes.AliceBlue, this.ClientRectangle);
                }
                else
                {
                    // Erase the previously drawn ellipse
                    g.FillEllipse(SystemBrushes.Control, this.ClientRectangle);
                }
            }
        }
1.3.2. Color
Color是一个struct类型,表示颜色。
示例:
private void button2_Click_1(object sender, EventArgs e)
{
    Button btn = (Button)sender;
    //btn.BackColor = ColorTranslator.FromHtml("#00FFFF");
    btn.BackColor = Color.FromArgb(10, 0, 255, 255);
    Color color = btn.BackColor;
    MessageBox.Show($"点击的按钮的背景色:R={color.R},G={color.G},B={color.B},alpha={color.A}");
}
1.3.3. Brush
System.Drawing.Brush是所有brush类型的基类,它是一个抽象类,它的派生类包括:
- HatchBrush:定义矩形画笔阴影样式、 前景颜色与背景色。
- LinearGradientBrush:封装 System.Drawing.Brush 带有线性渐变。
- PathGradientBrush:封装 System.Drawing.Brush 填充的内部对象
- SolidBrush: 画笔用于填充图形形状,如矩形、 椭圆、 饼、 多边形和路径。
- TextureBrush:每个属性 System.Drawing.TextureBrush 类是 System.Drawing.Brush 用图像来填充形状的内部对象。
这几个派生类都是sealed class,不能被继承。
1.3.3.1. 示例
以TextureBrush为例:
 bool drawRectangle = false;
        private void btnTextureBrush_Click(object sender, EventArgs e)
        {
            drawRectangle = !drawRectangle;
            using (Graphics g = this.CreateGraphics())
            {
                if (this.drawRectangle)
                {
                    Image bitmap = new Bitmap(@"C:\Program Files (x86)\360\360zip\config\defaultskin\Skin.jpg");
                    TextureBrush textureBrush = new TextureBrush(bitmap);
                    textureBrush.WrapMode = WrapMode.TileFlipX;
                    g.FillRectangle(textureBrush, this.ClientRectangle);
                }
                else
                {
                    g.FillRectangle(SystemBrushes.Control, this.ClientRectangle);
                }
            }
        }
1.3.4. Pen
Brushes用来填充形状,而Pen用来画形状的框架。
System.Drawing.Pen是一个sealed class,没有派生类。
1.3.4.1. 示例
bool drawLine = false;
        private void btnDrawLine_Click(object sender, EventArgs e)
        {
            drawLine = !drawLine;
            using(Graphics g = this.CreateGraphics())
            {
                Pen pen = new Pen(Color.Blue,10.0F);
                //指定画笔开端的样式
                pen.StartCap = LineCap.RoundAnchor;
                //指定画笔末端的样式
                pen.EndCap = LineCap.ArrowAnchor;
                //Dash样式
                pen.DashStyle = DashStyle.Dot;
                //
                pen.Alignment = PenAlignment.Inset;
                //joins
                pen.LineJoin = LineJoin.Round;

                if (drawLine)
                {
                    g.DrawLine(pen, 300, 300, 600, 600);
                }
                else
                {
                    Pen pen1 = new Pen(SystemColors.Control, 10);
                    //指定画笔开端的样式
                    pen1.StartCap = LineCap.RoundAnchor;
                    pen1.EndCap = LineCap.ArrowAnchor;
                    g.DrawLine(pen1, 300, 300, 600, 600);
                }
            }
        }
1.3.5. Images
System.Drawing.Image:一个抽象基类,提供了用于功能 System.Drawing.Bitmap 和 System.Drawing.Imaging.Metafile 继承的类。
1.3.5.1. 示例
bool drawWMF = false;
        private void btnDrawWMF_Click(object sender, EventArgs e)
        {
            drawWMF = !drawWMF;
            using(Graphics g = this.CreateGraphics())
            {
                Rectangle rectangle = new Rectangle(500, 500, 200, 200);
                if (drawWMF)
                {
                    Metafile metafile = new Metafile(@"C:\Program Files\Microsoft Office\root\CLIPART\PUB60COR\AN00010_.WMF");
                    g.DrawImage(metafile, rectangle);
                }
                else
                {
                    Brush brush = new SolidBrush(SystemColors.Control);
                    g.FillRectangle(brush, rectangle);
                }
            }
        }
1.4. Component
组件:Component是继承了IComponent接口的类,本质上,组件是可重用的、可配置的类。因此,他们没有通过表单提供对用户交互的本地支持,例如通过暴露一个UI由表单托管或处理键盘和鼠标输入。
对UI交互的内在支持是由控件完成,这一点区别也体现在控件和组件在窗口设计的位置上:控件在窗口上的可视设计面上,而组件是在非可视设计面,也叫组件托盘。
如下图所示:
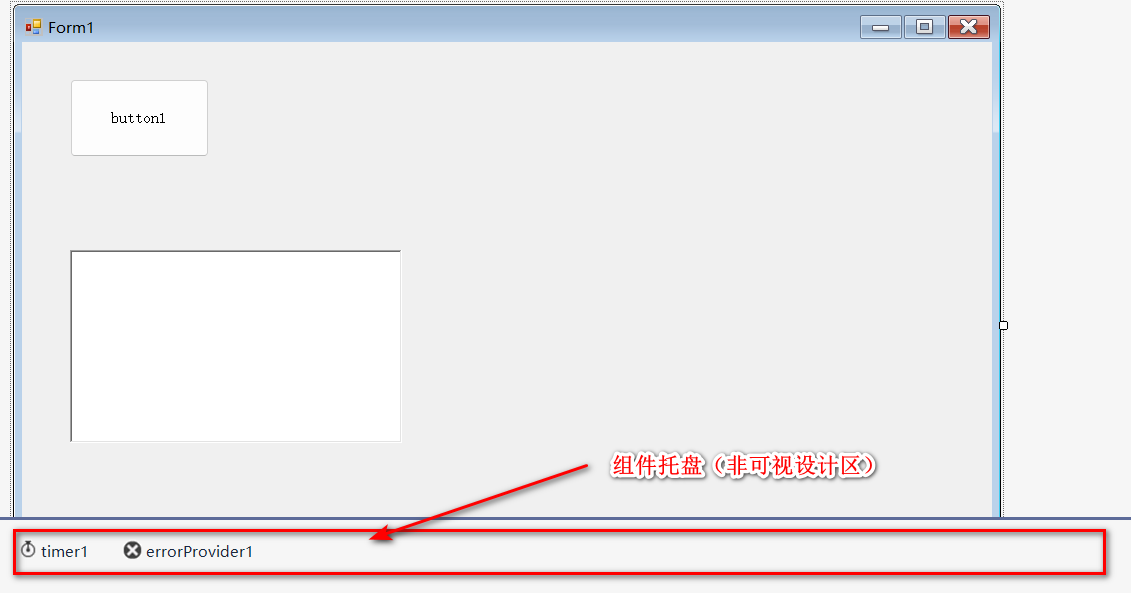
有一些控件(Controls)也在组件托盘上显示为伪组件,比如ToolStrip控件。
1.4.1. 使用组件
把组件拖放到窗口中,就可以像使用任何常规类一样使用组件。**创建新组件时,它将与表单上的其他组件一起放在容器管理的列表中。这允许表单跟踪托管组件,并提供自动资源管理。 **
比如,在把一个组件Timer添加到窗口上时,设计器会生成如下代码:
private void InitializeComponent()
        {
            this.components = new System.ComponentModel.Container();
            this.timer1 = new System.Windows.Forms.Timer(this.components);
            ...
	    }
使用Timer组件的示例:
//设计器生成的代码
// timer1
//
this.timer1.Enabled = true;
this.timer1.Interval = 1000;
this.timer1.Tick += new System.EventHandler(this.timer1_Tick);


//自己实现的事件处理方法
private void timer1_Tick(object sender, EventArgs e)
{
    Console.WriteLine(DateTime.Now);
}
上面两段代码分别在Designer.cs和.cs中,当窗口启动,每隔1s控制台输出当前日期时间。
1.4.2. 组件继承
我们扩展组件可以通过自定义组件和派生预定义组件的方式完成,下面是一个MyTimer组件的派生。
using System;
using System.Collections.Generic;
using System.ComponentModel;
using System.Diagnostics;
using System.Linq;
using System.Text;
using System.Threading.Tasks;
using System.Windows.Forms;

namespace TestComponents
{
    public partial class MyTimer : Timer
    {
        public MyTimer()
        {
            InitializeComponent();
        }

        public MyTimer(IContainer container)
        {
            container.Add(this);

            InitializeComponent();
        }

        protected override void OnTick(EventArgs e)
        {
            //base.OnTick(e);
            Console.WriteLine(DateTime.Now.ToString()+" MyTimer tick()被调用");
        }
    }
}
运行结果:
2022/7/27 9:37:09 MyTimer tick()被调用
2022/7/27 9:37:11 MyTimer tick()被调用
2022/7/27 9:37:13 MyTimer tick()被调用
2022/7/27 9:37:15 MyTimer tick()被调用
2022/7/27 9:37:17 MyTimer tick()被调用
2022/7/27 9:37:19 MyTimer tick()被调用
注意:一个关键的区别是我们覆盖Timer的受保护的虚拟OnTick方法,而不是处理它的Tick事件。大多数基类为公共事件、受保护事件和内部事件提供受保护的虚拟方法,以节省编写事件注册代码的时间,并提高性能。
派生组件在编写代码后编译项目,然后就可以在ToolBox中找到并拖放了。
1.5. Control
-
定义 控件是一个可重用的类,派生自
System.Windows.Forms.Control(直接或间接),其主要用途是代表容器与用户交互,容器既可以是表单,也可以是容器控件控件的用户交互有两种形式:通过鼠标和键盘接受用户输入,以及将处理结果和状态表示为UI输出。 - 控件和组件的关系 Control类派生自Component类
1.5.1. 使用控件
- 继承
继承控件跟继承组件类似,可以自行指定事件处理方法,也可以覆盖基类的OnXXX()方法
示例:
 using System;
 using System.Collections.Generic;
 using System.ComponentModel;
 using System.Data;
 using System.Drawing;
 using System.IO;
 using System.Linq;
 using System.Text;
 using System.Threading.Tasks;
 using System.Windows.Forms;

 namespace TestControl
 {
     public partial class FileTextBox : TextBox
     {
         public FileTextBox()
         {
             InitializeComponent();
         }
         protected override void OnTextChanged(EventArgs e)
         {
             // Let the base class process changed text first
             base.OnTextChanged(e);
             // If the file does not exist, color the text red
             if (!File.Exists(this.Text))
             {
                 this.ForeColor = Color.Red;
                 MessageBox.Show($"文件{this.Text}不存在");
             }
             else
             { // Make it black
                 this.ForeColor = Color.Black;
             }
         }
     }
 }
1.6. Application
Application是指任何扩展名为.exe并可以从windows shell启动的程序。
在.Net中,Application是一个sealed class,并且它的所有成员都是static的。
注意:Application类的所有成员都是静态的。虽然在Windows窗体中有每个应用程序的状态,但没有应用程序类的实例。相反,Application类是一种作用域机制,用于公开该类提供的各种服务,包括控制应用程序生命周期和支持消息处理。
1.6.1. Application生命周期
当Main方法被调用时,Windows窗体应用程序启动。然而,要完全初始化Windows窗体应用程序并启动它路由Windows窗体事件,你需要调用应用程序三种方式中的一种:
- 调用Application.Run()
这种方式只适合已经这种方法只有在已经使用了其他方法来显示初始UI时才有用:
 static class Program {
 [STAThread]
 static void Main() {
 ...
 // Create and show the main form modelessly
 MainForm form = new MainForm();
 form.Show();
 // Run the application
 Application.Run();
 }
 }
当调用不带参数的Run(),应用程序会一直运行,除非显示通知应用程序关闭,通常需要在主窗口的关闭事件中调用
Application.Exit() - 调用Application.Run(Form form) 这种调用方式的好处是当form表单关闭时,Application就会退出,不需要手动调用Application.Exit()
1.6.2. Application Context
在Application.Run()内部会创建一个ApplicationContext类的实例,这个类用来指定应用程序线程的上下文信息
事实上,Application.Run()允许自己传一个ApplicationContext实例:
using System;
using System.Collections.Generic;
using System.Linq;
using System.Threading.Tasks;
using System.Windows.Forms;

namespace TestApplication
{
    static class Program
    {
        /// <summary>
        /// 应用程序的主入口点。
        /// </summary>
        [STAThread]
        static void Main()
        {
            Application.EnableVisualStyles();
            Application.SetCompatibleTextRenderingDefault(false);
            ApplicationContext ctx = new ApplicationContext(new MainForm());
            Application.Run(ctx);
        }
    }
}
1.6.3. Application Events
在Application生命周期中有几个关键的事件:Idle、ThreadExit和ApplicationExit,可以在任何时候订阅这些事件,但通常是在Main()方法中。
1.6.4. 单实例应用
VB.NET提供了一个类WindowsFormsApplicationBase用来对Application做扩展,可以通过这个类实现限制应用只能有一个实例:
- 项目添加Microsoft.VisualBasic引用
- 继承WindowsFormsApplicationBase,设置单例属性,重写方法
using Microsoft.VisualBasic.ApplicationServices; using System; using System.Collections.Generic; using System.Linq; using System.Text; using System.Threading.Tasks; namespace TestApplication { class SingleInstanceApplication:WindowsFormsApplicationBase { public SingleInstanceApplication() { this.IsSingleInstance = true; } protected override void OnCreateMainForm() { this.MainForm = new MainForm(); } } } - 创建应用实例,启动程序 最后的效果是,当试图启动超过1个以上的exe进程时,系统会自动激活已经存在的程序实例的窗口,不会继续创建进程。
1.7. 数据绑定
在WinForm中常常要将数据对象和控件对象之间解耦,要完成数据对象和UI控件之间的数据绑定,可以通过事件机制来实现:
实体类User:
using System;
using System.Collections.Generic;
using System.ComponentModel;
using System.Linq;
using System.Text;
using System.Threading.Tasks;

namespace TestDataBind.Entity
{
    class User : INotifyPropertyChanged
    {
        private string username;
        private int age;
        public event PropertyChangedEventHandler PropertyChanged;
        public string Username
        {
            get { return this.username; }
            set
            {
                this.username = value;
                this.OnPropertyChanged("Name");
            }
        }


        public int Age
        {
            get { return this.age; }
            set
            {
                this.age = value;
                this.OnPropertyChanged("Age");
            }

        }
        private void OnPropertyChanged(string propertyName)
        {
            if (this.PropertyChanged != null)
            {
                this.PropertyChanged(this, new PropertyChangedEventArgs(propertyName));
            }
        }
    }
}
Form.cs:
namespace TestDataBind
{
    public partial class MainForm : Form
    {
        private User user = new User();
        public MainForm()
        {
            InitializeComponent();
            this.user.PropertyChanged += User_PropertyChanged;
        }

        private void User_PropertyChanged(object sender, PropertyChangedEventArgs e)
        {
            switch (e.PropertyName)
            {
                case "Name":
                    this.tbxUsername.Text = this.user.Username;
                    break;
                case "Age":
                    this.tbxAge.Text = this.user.Age.ToString();
                    break;
            }
        }

        private void button1_Click(object sender, EventArgs e)
        {
            this.user.Age++;
        }

        private void tbxUsername_TextChanged(object sender, EventArgs e)
        {
            this.user.Username = tbxUsername.Text;
        }

        private void tbxAge_TextChanged(object sender, EventArgs e)
        {
            this.user.Age = Int32.Parse(tbxAge.Text);
        }
    }
}
程序效果如下:
1.7.1. WinForm数据绑定
从上面的例子看到,要实现数据对象和UI对象之间的双向绑定需要写比较繁多的代码且需要熟悉实体对象。幸运的时,WinForm提供了数据绑定引擎帮我们做这些工作。
1.7.1.1. 简单数据绑定
下面是一个简单数据绑定的例子,还是基于上面数据绑定的示例,这次使用到控件的DataBingdings属性添加绑定关系:
namespace TestDataBind
{
    public partial class MainForm2: Form
    {
        /*
         使用数据绑定对象实现双向数据绑定
         */
        private User user = new User();
        public MainForm2()
        {
            InitializeComponent();
            //
            /*
             Binding nameBinding = new Binding("Text", this.user, "Username", true);
             //获取控件的DataBindings集合并添加
             this.tbxUsername.DataBindings.Add(nameBinding);
             Binding ageBinding = new Binding("Text", this.user, "Age", true);
             this.tbxAge.DataBindings.Add(ageBinding);
            */
            //简化方法
            this.tbxUsername.DataBindings.Add("Text", this.user, "Username");
            this.tbxAge.DataBindings.Add("Text", this.user, "Age");
        }


        private void button1_Click(object sender, EventArgs e)
        {
            this.user.Age++;
        }

    }
}
可以看到使用DataBingdingss实现数据绑定,代码非常简洁,让我们可以把更多的精力放在功能逻辑的实现而不是数据展现上面。 注意:数据绑定需要数据源对象在属性变化时触发PropertyChanged事件,因此实体类依然需要实现对应的接口并在属性set时触发对应的事件。
像User这样的类叫做项数据源(item data source),因为数据存在于单个项中,当我们需要的数据源存在于集合中时,就需要使用列表数据源(list data source)。
1.7.1.2. List数据绑定
对于list类型的数据源,添加到控件的DataBindings之后被一个叫binding manager的东西管理,通过binding manger可以让指针指向数据源中的某一项。
一个简单的示例程序如下:
using System;
using System.Collections.Generic;
using System.ComponentModel;
using System.Data;
using System.Drawing;
using System.Linq;
using System.Text;
using System.Threading.Tasks;
using System.Windows.Forms;
using TestDataBind.Entity;

namespace TestDataBind
{
    public partial class SimpleBindingAndListDataSourcesForm : Form
    {
        private List<User> users = new List<User>();
        public SimpleBindingAndListDataSourcesForm()
        {
            InitializeComponent();
            //添加数据
            this.users.Add(new User("杰克马", 46));
            this.users.Add(new User("刘强东", 44));
            this.users.Add(new User("麻花藤", 45));

            //绑定数据源
            this.tbxUsername.DataBindings.Add("Text", users, "Username");
            this.tbxAge.DataBindings.Add("Text", users, "Age");

            RefreshItems();
        }
        BindingManagerBase BindingManager
        {
            get { return this.BindingContext[this.users]; }
        }

        private void btnMoveToFirst_Click(object sender, EventArgs e)
        {
            this.BindingManager.Position = 0;
            RefreshItems();

        }

        private void btnMoveToPre_Click(object sender, EventArgs e)
        {
            --this.BindingManager.Position;
            RefreshItems();
        }

        private void btnMoveToNext_Click(object sender, EventArgs e)
        {
            ++this.BindingManager.Position;

            RefreshItems();
        }

        private void btnMoveToLast_Click(object sender, EventArgs e)
        {
            this.BindingManager.Position=this.BindingManager.Count-1;
            RefreshItems();
        }

        private void RefreshItems()
        {
            int count = this.BindingManager.Count;
            int position = this.BindingManager.Position+1;

            this.lbCount.Text = count.ToString();
            this.lbPosition.Text = position.ToString();

            this.btnMoveToFirst.Enabled = position > 1;
            this.btnMoveToPre.Enabled = position > 1;

            this.btnMoveToNext.Enabled = position < count;
            this.btnMoveToLast.Enabled = position < count;
        }
    }
}
效果如下: ![][62e0fdb7060c9.gif] [62e0fdb7060c9.gif]: https://s1.daohangmao.net/2022/07/27/62e0fdb7060c9.gif
上面是List类型的数据源绑定到普通控件的例子,List类型的数据源还可以绑定到ListBox这样的列表类型的控件:
//绑定到listBox上
this.lbxUser.DataSource = this.users;
this.lbxUser.DisplayMember = "Username";
tbxUsername、tbxAge、lbxUser三个控件都绑定到相同的列表数据源,这意味着它们在默认情况下共享相同的绑定管理器。
效果: ![][62e10461714b4.gif] [62e10461714b4.gif]: https://s1.daohangmao.net/2022/07/27/62e10461714b4.gif
1.7.1.3. DataGridView绑定数据源
现在这个程序还不能增加和删除User,我们可以通过更新UI来实现,也可以使用DataGridView,它内置了额外的支持。
using System;
using System.Collections.Generic;
using System.ComponentModel;
using System.Data;
using System.Drawing;
using System.Linq;
using System.Text;
using System.Threading.Tasks;
using System.Windows.Forms;
using TestDataBind.Entity;

namespace TestDataBind
{
    public partial class ComplexBindingDataGridViewForm : Form
    {

        private BindingList<User> users = new BindingList<User>();
        public ComplexBindingDataGridViewForm()
        {
            InitializeComponent();
            this.users.Add(new User("Tom", 23));
            this.users.Add(new User("Mary", 22));
            this.users.Add(new User("Alice", 21));
            this.users.Add(new User("Jack", 19));
            this.users.Add(new User("Zeus", 25));

            //数据源绑定
            this.dgvUsers.DataSource = this.users;
        }
        BindingManagerBase BindingManager
        {
            get { return this.BindingContext[this.users]; }
        }
        private void btnAdd_Click(object sender, EventArgs e)
        {
            this.users.Add(new User("孙悟空", 5000));
            this.BindingManager.Position = this.BindingManager.Count - 1;
            this.btnDelete.Enabled = true;
        }

        private void btnDelete_Click(object sender, EventArgs e)
        {
            this.users.Remove((User)this.BindingManager.Current);
            if (this.users.Count == 0)
            {
                ((Button)sender).Enabled = false;
            }
        }

        private void btnAddAge_Click(object sender, EventArgs e)
        {
            int position = this.BindingManager.Position;
            ++this.users[position].Age;
        }
    }
}
为了实现和DataGridView的双向绑定,List数据源不能用普通的List,而要用BindingList类型封装。 效果: ![][62e123c9c5360.gif] [62e123c9c5360.gif]: https://s1.daohangmao.net/2022/07/27/62e123c9c5360.gif
除了数据源使用BindList类型之外,还有另一种方法实现和DataGridView的双向绑定:使用BindingSource类,示例代码如下:
using System;
using System.Collections.Generic;
using System.ComponentModel;
using System.Data;
using System.Drawing;
using System.Linq;
using System.Text;
using System.Threading.Tasks;
using System.Windows.Forms;
using TestDataBind.Entity;

namespace TestDataBind
{
    public partial class BindingSourceForm : Form
    {

        //private BindingList<User> users = new BindingList<User>();
        //使用普通List类型,用BindSource实现修改等的通知
        private List<User> users = new List<User>();

        public BindingSourceForm()
        {
            InitializeComponent();
            this.users.Add(new User("Tom", 23));
            this.users.Add(new User("Mary", 22));
            this.users.Add(new User("Alice", 21));
            this.users.Add(new User("Jack", 19));
            this.users.Add(new User("Zeus", 25));

            this.usersBindingSource.DataSource = this.users;
            //数据源绑定
            this.dgvUsers.DataSource = this.usersBindingSource;
        }

        //注意这里绑定管理器获取的索引是BindingSource实例
        BindingManagerBase BindingManager
        {
            get { return this.BindingContext[this.usersBindingSource]; }
        }
        private void btnAdd_Click(object sender, EventArgs e)
        {
            //this.users.Add(new User("孙悟空", 5000));
            this.usersBindingSource.Add(new User("孙悟空", 5000));

            this.BindingManager.Position = this.BindingManager.Count - 1;
            this.btnDelete.Enabled = true;
        }

        private void btnDelete_Click(object sender, EventArgs e)
        {
            //this.users.Remove((User)this.BindingManager.Current);
            this.usersBindingSource.Remove(this.BindingManager.Current);
            if (this.users.Count == 0)
            {
                ((Button)sender).Enabled = false;
            }
        }

        private void btnAddAge_Click(object sender, EventArgs e)
        {
            int position = this.BindingManager.Position;
            //++this.users[position].Age;
            ++((User)this.usersBindingSource[position]).Age;
        }
    }
}
效果和上面的是一样的。
1.8. 多线程用户界面
在WinForm应用中,有时候需要用到多线程执行某些任务并在非UI线程中更新UI控件的内容,我们可以通过Invoke和BeginInvoke去完成这样的操作,但WinForm提供了一个组件帮助简化这些工作—— System.ComponentModel.BackgroundWorker。