1. 在线论坛
1.1. 搭建项目环境
1.2. 开发登录功能
- 发送邮件
- 引入spring-boot-starter-mail
- 邮箱参数配置
- 编写发送邮件的工具类
- 注册
- 浏览器发送表单
- 服务器接受请求,调用service注册
- 响应注册结果
- 登录
-
引入Kaptcha依赖,生成随机验证码 ```java @Configuration public class KaptchaConfig {
@Bean public Producer kaptchaProducer() { DefaultKaptcha kaptcha = new DefaultKaptcha(); Properties properties = new Properties(); properties.setProperty(“kaptcha.image.width”, “100”); properties.setProperty(“kaptcha.image.high”, “40”); properties.setProperty(“kaptcha.textproducer.font.size”, “32”); properties.setProperty(“kaptcha.textproducer.font.color”, “0,0,0”); properties.setProperty(“kaptcha.textproducer.char.string”, “0123456789ABCDEFGHIJKLMNOPQRSTUVWXYZ”); //验证码长度 properties.setProperty(“kaptcha.textproducer.char.length”, “4”);
   //噪声类
   properties.setProperty("kaptcha.noise.impl", "com.google.code.kaptcha.impl.NoNoise");

   Config config = new Config(properties);
   kaptcha.setConfig(config);
   return kaptcha;
} }
- 编写验证码接口 ```java @RequestMapping(path="/kaptcha",method = RequestMethod.GET) public void getKaptcha(HttpServletResponse response,HttpSession session) throws IOException { String code = kaptchaProducer.createText(); BufferedImage codeImage = kaptchaProducer.createImage(code); //将验证码存入session session.setAttribute("kaptcha",code); response.setContentType("image/png"); ServletOutputStream outputStream = response.getOutputStream(); ImageIO.write(codeImage, "png", outputStream); } -
1.3. 发布帖子
- 对标题和帖子内容做过滤,包括:
- html元素(利用spring.web提供的HtmlUtils)
- js脚本
- 敏感词汇
1.4. 显示评论、发布评论
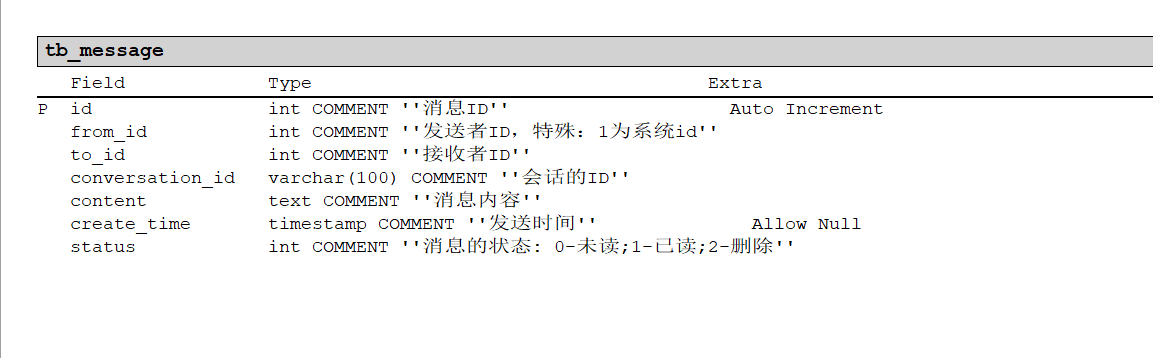
1.5. 显示私信、发送私信
私信数据直接用MySQL进行存储,表结构如下:
示例数据如下:

说明:conversation_id由from_id和to_id拼接而成,且大的id在前,小的在后面,保证两个用户在同一个会话中。
1.5.1. 发送私信
- 使用ajax发送请求,请求响应后刷新私信列表
- 当访问私信详情时,将私信状态改为已读
1.5.2. 删除私信
让消息框元素带上消息id,当点击消息元素的close类的元素时获取消息id,发送post请求删除消息 js的代码如下:
function delete_msg() {

	//3.元素移除
	var e=$(this).parents(".media");
	if (confirm('您确定要删除这条消息吗?')) {
		//1.获取要删除的消息的id
		var deleteId = $(this).parents(".media").attr('id');
		console.log('要删除的消息id是:' + deleteId);

		//2.发送删除消息请求
		$.post(
			'/message/delete',
			{
				"messageId": deleteId
			},
			function (response) {
				if (response.code == 0) {
					alert('删除消息成功!');
					e.remove();
					console.log('删除消息成功');
				} else {
					alert('删除消息失败!' + response.msg);

				}
			}
		)

	}
}
1.6. 统一处理异常
-
使用BasicErrorController处理404异常
-
使用@ControllerAdivce+@ExceptionHandler处理500异常
1.7. 点赞
使用Redis存储点赞数据 主要存储的点赞数据有两类:
- 帖子或评论的点赞,以set方式存储,集合存储点赞的用户id,格式为 例如like:entity:0:10=[101,104,83]代表ID为10的帖子被ID为101、104、83的用户点赞 例如like:entity:1:33=[102,105,100]代表ID为33的评论被ID为102、105、100的用户点赞
- 用户的获赞数,直接用key-value存储,key的形式为like:user:{userid}=count
1.8. 关注与粉丝
需求:
- 关注、取消关注功能
- 统计用户的关注数和粉丝数
- 显示用户的粉丝列表和关注列表
实现:
跟点赞功能一样,粉丝数据和关注数据使用Redis存储,key的形式:
- 实体的粉丝
粉丝key格式:
follower:{entityType}:{entityId}={userId=xxx,score=xxx} - 用户的关注 followee:{userid}:{entityType}={entityId=xxx,score=xxx}
1.9. 优化登录模块
-
使用redis存储验证码
-
使用redis存储登录凭证
-
使用redis缓存用户信息 对于UserService.findUserById(),先从redis缓存查询,如果没有,初始化缓存,将user存入,如果user更新了信息,需要清除缓存。
1.10. 系统通知(使用Kafka)
1.10.1. Kafka
- 下载Kafka
- 启动zookeeper:
./zookeeper-server-start.sh -daemon ../config/zookeeper.propertieszookeeper默认端口:2181 - 启动Kafka:
./kafka-server-start.sh -daemon ../config/server.propertiesKafka默认端口:90921.10.2. 功能
- 需求 当用户被点赞、关注、评论时,系统发送通知消息(通知和处理通知是异步方式)。
- 实现
- 后台
- 安装Kafka服务器
- 创建Kafka消费者和Kafka生产者
-
在触发点赞、关注、评论行为时,生产者向事件服务器发送事件,事件封装了通知相关的信息。 消费者消费事件,具体就是向数据库插入消息记录。
- 用户在登录时查询相关系统消息并显示。
- 前台
- 通知列表:显示评论、点赞、关注三种类型的通知
- 通知详情:分页显示某一类主题所包含的通知
- 未读消息:在页面头部显示所有的未读消息数量
- 后台
1.11. 搜索功能
需求:实现论坛搜索功能
- 安装elasticsearch
- 下载解压
- 修改配置(注意需要登录到非root用户)
- [用户名@centos-elk ~]$ sudo vi /etc/security/limits.conf #添加以下内容 用户名 hard nofile 65536 用户名 soft nofile 65536 重新登录
- 配置文件elastisearch.yml样本 ```yml # ======================== Elasticsearch Configuration ========================= # # NOTE: Elasticsearch comes with reasonable defaults for most settings. # Before you set out to tweak and tune the configuration, make sure you # understand what are you trying to accomplish and the consequences. # # The primary way of configuring a node is via this file. This template lists # the most important settings you may want to configure for a production cluster. # # Please consult the documentation for further information on configuration options: # https://www.elastic.co/guide/en/elasticsearch/reference/index.html # # ———————————- Cluster ———————————– # # Use a descriptive name for yourcluster: # cluster.name: nowcoder # # ———————————— Node ———————————— # # Use a descriptive name for the node: # #node.name: node-1 # # Add custom attributes to the node: # #node.attr.rack: r1 # # ———————————– Paths ———————————— # # Path to directory where to store the data (separate multiple locations by comma): #data目录 path.data: /usr/local/elasticsearch-7.12.1/data # # Path to log files: #日志文件路径 path.logs: /usr/local/elasticsearch-7.12.1/logs # # ———————————– Memory ———————————– # # Lock the memory on startup: # #bootstrap.memory_lock: true # # Make sure that the heap size is set to about half the memory available # on the system and that the owner of the process is allowed to use this # limit. # # Elasticsearch performs poorly when the system is swapping the memory. # # ———————————- Network ———————————– # # By default Elasticsearch is only accessible on localhost. Set a different # address here to expose this node on the network: # network.host: 0.0.0.0 # # By default Elasticsearch listens for HTTP traffic on the first free port it # finds starting at 9200. Set a specific HTTP port here: # http.port: 9200 # # For more information, consult the network module documentation. # # ——————————— Discovery ———————————- # # Pass an initial list of hosts to perform discovery when this node is started: # The default list of hosts is [“127.0.0.1”, “[::1]”] # #discovery.seed_hosts: [“host1”, “host2”] # # Bootstrap the cluster using an initial set of master-eligible nodes: # #cluster.initial_master_nodes: [“127.0.0.1”, “node-2”] # # For more information, consult the discovery and cluster formation module documentation. # # ———————————- Various ———————————– # # Require explicit names when deleting indices: # #是否禁用交换区 bootstrap.memory_lock: false #因为Centos6起不支持SecComp,而ES默认bootstrap.system_call_filter为true进行检测 bootstrap.system_call_filter: false #action.destructive_requires_name: true
discovery.seed_hosts: [“127.0.0.1”]
cluster.initial_master_nodes: [“node-1”]
```
- 安装中文分词插件:https://github.com/medcl/elasticsearch-analysis-ik
- 启动,es安全配置默认不能以root用户启动,切换到其他用户,进入elasticsearch
- Spring Boot整合elasticsearch
- 导入依赖starter-data-elasticsearch
- 配置
- 使用(注意新版本和老版本的client API区别)
需求实现:
- 新增帖子时将帖子增加到搜索服务器(异步)
- 删除帖子是删除搜索服务器的帖子(异步)
- 帖子搜索功能
1.12. 认证鉴权升级-使用Spring Security
主要的需求和功能整改:
-
登录检查:将拦截器方案改为使用Spring Security来实现认证授权 登录方案不变,使用自定义的Interceptor检查登录,授权交给Spring Security, 主要是用在拦截器preHandler()方法中用SecurityContextHolder存储用户和其权限信息, Security有一个过滤器会将SecurityContextHolder中的context存储到当前请求的session中,并在过滤器链执行完后清除SecurityContextHolder中的context(holder使用ThreadLocal存储context):
SecurityContextPersistenceFilter.doFilter(HttpServletRequest, HttpServletResponse, FilterChain) - 访问控制:为系统的不同角色分配不同权限:普通用户、版主、管理员
- CSRF配置: 防止CSRF攻击
1.13. 帖子状态:置顶、加精
需求:
- 帖子置顶(版主)、加精(版主)、删除(管理员)
- 不同权限的用户这上面的操作有不同的访问权限
实现:
- 引入thymeleaf-security实现不同权限的菜单(置顶、加精和删除按钮)显示
<dependency>
         <groupId>org.thymeleaf.extras</groupId>
         <artifactId>thymeleaf-extras-springsecurity5</artifactId>
     </dependency>
1.14. 网站数据统计
技术点:redis高级数据结构Hyperloglog和bitmap
- 需求:
- 统计UV(Unique Visitor)——使用hyperloglog
- 统计DAU(Daily Active User)——使用bitmap
1.15. 热门贴排行
当帖子发生发帖、点赞、评论、加精等行为,将帖子ID加入redis缓存的一个set,服务器每1分钟对这个Set中的所有帖子进行score刷新。
1.16. 缓存
使用Caffeine缓存前几页帖子,降低数据库读压力