1. Spring注解驱动开发
1.1. IOC
1.1.1. 组件注册
在Spring注解驱动开发中,将Bean在容器中注册主要有以下方式:
- @Component+@ComponentScan
- @Configuration+@Bean
- @Import
- 实现
FactryBean<T>接口
1.1.2. 特定环境Bean注册
@Profile注解可以标注在类、方法上,它接收一个String[]数组,代表一个类的环境标识,当特定的标识被设置,组件才会注册到容器中。
比如:
@Profile({ "dev", "default" })
    @Bean("devDataSource")
    public DataSource devDataSource() {
        DruidDataSource dataSource = new DruidDataSource();
        String url = "jdbc:mysql://localhost:3306/db1?serverTimezone=GMT%2B8";
        dataSource.setUrl(url);
        dataSource.setDriverClassName("com.mysql.cj.jdbc.Driver");
        dataSource.setUsername("root");
        dataSource.setPassword("root");
        return dataSource;

    }

    @Profile("test")
    @Bean("testDataSource")
    public DataSource testDataSource() {
        DruidDataSource dataSource = new DruidDataSource();
        String url = "jdbc:mysql://localhost:3306/db1?serverTimezone=GMT%2B8";
        dataSource.setUrl(url);
        dataSource.setDriverClassName("com.mysql.cj.jdbc.Driver");
        dataSource.setUsername("root");
        dataSource.setPassword("root");
        return dataSource;

    }

    @Profile("prod")
    @Bean("prodDataSource")
    public DataSource prodDataSource() {
        DruidDataSource dataSource = new DruidDataSource();
        String url = "jdbc:mysql://localhost:3306/db1?serverTimezone=GMT%2B8";
        dataSource.setUrl(url);
        dataSource.setDriverClassName("com.mysql.cj.jdbc.Driver");
        dataSource.setUsername("root");
        dataSource.setPassword("root");
        return dataSource;

    }
- 当设置参数spring.profiles.active时,标注了@Profile的特定环境的Bean会被注册,比如spring.profiles.active=dev,则devDataSource返回的组件将会被注册到容器中,这个参数有一个默认值”default”,当不设置任何值,默认为default环境。
- spring.profiles.active可以设置多个值比如spring.profiles.active=dev,test,则dev和test环境的Bean都会注册到容器中。
1.1.3. 生命周期方法
Bean可以指定初始化和销毁的方法,当Bean注册到IOC容器中后,由容器进行调用。
主要有以下几种方式指定:
- @Bean注解指定initMethod和destroyMethod
- 让Bean实现
InitializingBean接口和DisposableBean接口,重写方法 - 使用JSR250规范定义的
@PostContruct和@PreDestroy,标注在Bean的方法上。
1.1.4. 依赖注入
在Spring注解驱动开发中,依赖注入主要有以下几种方式:
-
@Autowired:默认按照Class类型注入,如果有多个Class相同的实例,会按照属性名注入,比如:
 @Autowired
 UserDao userDao;
就会在容器中寻找id是”userDao”的实例进行注入,如果有多个UserDao实例而且id都和要注入的属性的名称不一致,则单独使用@Autowired则会抛出异常,必须配合
@Qualifier指定组件的id。 - JSR250的
@Resource,按照id注入 - JSR330的
@Inject,需要导入javax.inject依赖
1.2. AOP
Aspect-Oriented Programming,面向切面编程。 在程序运行期间将某段代码切入到某个方法的指定位置(之前、之后等等)执行的编程方式。
1.2.1. 例子
- 创建目标方法
import org.springframework.stereotype.Component; @Component public class Calculator { public int div(int i,int j) { return i/j; } } - 创建切面类,声明通知和切点
@Component @Aspect public class AspectLogging { /** * 切点 */ @Pointcut("execution(public int com.hb.anno.aop.Calculator.*(..))") public void p1() { } @Before(value = "p1()") public void logBefore(JoinPoint joinPoint) { Signature signature = joinPoint.getSignature(); Object[] args = joinPoint.getArgs(); System.out.println("before...."); System.out.print("参数值:"); for (int i = 0; i < args.length; i++) { System.out.print(args[i]); if(i<args.length-1)System.out.print(","); } System.out.println(); System.out.println(signature+"被调用"); } @After(value = "p1()") public void logAfter(JoinPoint joinPoint) { Signature signature = joinPoint.getSignature(); System.out.println("after...."); System.out.println(signature+"被调用完成"); } @AfterReturning(value = "p1()",returning ="result" ) public void logReturn(Object result) { System.out.print("return...."); System.out.println("返回值:"+result); } @AfterThrowing(value="p1()",throwing = "ex") public void logEx(Exception ex) { System.out.print("exception...."); System.out.println("异常类型:"+ex); } } - 开启自动代理
@Configuration @EnableAspectJAutoProxy @ComponentScan(basePackages = {"com.hb.anno.aop"}) public class AspectConfiguration { } - 执行目标方法(从容器中获取目标对象)
@Test
 public void testAop() throws Exception {
     AnnotationConfigApplicationContext applicationContext = new AnnotationConfigApplicationContext(AspectConfiguration.class);
     /*
      * String[] beanDefinitionNames = applicationContext.getBeanDefinitionNames();
      * for (String beanName : beanDefinitionNames) { System.out.println(beanName); }
      */

     //必须从容器中获取实例才能实现动态的切面织入
 //		Calculator calculator = new Calculator();
     Calculator calculator = applicationContext.getBean(Calculator.class);
     calculator.div(4, 2);
     System.out.println("---------------------------");
     calculator.div(1, 0);

 }
结果:
 before....
 参数值:4,2
 int com.hb.anno.aop.Calculator.div(int,int)被调用
 after....
 int com.hb.anno.aop.Calculator.div(int,int)被调用完成
 return....返回值:2
 ---------------------------
 before....
 参数值:1,0
 int com.hb.anno.aop.Calculator.div(int,int)被调用
 after....
 int com.hb.anno.aop.Calculator.div(int,int)被调用完成
 exception....异常类型:java.lang.ArithmeticException: / by zero
1.2.2. spring事务
spring很好地支持声明式事务,依赖于AOP,它提供事务管理器,本质是一个切面类,它在事务方法之前开启事务,在事务方法正常执行结束执行提交事务,在事务方法抛出异常时进行事务回滚。
开启了事务管理的类会生成其代理类并保存到IOC容器中。
1.2.2.1. 开启spring事务管理
使用spring管理事务的简单例子(以注解驱动开发为例):
- 引入spring事务的依赖spring-tx
- 配置要使用的事务管理器,并给它配置DataSource
- 在需要事务管理的方法上使用
@Transactional注解 - 在@Configuration类上加上
@EnableTransactionManagement,开启事务管理。 - 测试事务管理是否正常开启
1.2.2.2. @Transactional
@Transactional可以标准在方法和类上,用于指定事务的属性。 比较重要的几个属性:
- propagation: 事务的传播类型,default:Propagation.REQUIRED
- isolation: 事务隔离等级,default:Isolation.DEFAULT
- timeout: 此次事务的超时时间,单位seconds
- readOnly: 如果一个事务是readOnly的,那么可以设为true允许运行时优化,default: false
- rollbackFor: 指定特定的异常,当这些异常发生时必须导致回滚
- noRollBackFor: 指定特定的异常,当这些异常发生时不允许回滚
1.2.2.3. @Transactional的属性-详细介绍
mysql MVCC:https://dev.mysql.com/doc/refman/8.0/en/innodb-multi-versioning.html
-
timeout是事务超时时间(也可以理解为存活时间),在事务方法开始执行之前会获取设置的timeout值,并根据当前时间和timeout设置一个Date类型的deadline。在标注了@Transaction的方法中,每一次sql执行前会检查是否没有超过deadline,如果是,则更新一个存活时间并设置到statement.setQueryTime()中;如果执行sql前当前时间已经超过了deadline,则抛出TransactionTimedOutException异常。 因此timeout并不是指整个@Transactional方法的执行时间,而是指从方法执行开始前到方法中最后一个sql执行完毕的时间,只要方法中最后一个sql在deadline之前执行完,不管方法后面还有什么代码,只要没有抛出异常事务都会成功提交,否则回滚事务。 典型例子:
下面这个方法会抛出TransactionTimedOutException异常(SQL执行时间忽略不计):
@Transactional(
         timeout = 2
         )
 public void transfer(String in,String out,double amount) throws InterruptedException {

     logger.info("转账方法执行,in:{},out:{},amout:{}",in,out,amount);
     Thread.sleep(2000L);

     Account outAccount = accountDao.findByHolder(out);
     if(outAccount.getBalance()<amount) {
         throw new RuntimeException("余额不足! ");
     }
     //转进账户增加amount
     accountDao.updateByHolder(in, amount);

     //转出账户减少amount
     accountDao.updateByHolder(out, -1*amount);


 }
下面这个方法不会抛出TransactionTimedOutException异常(SQL执行时间忽略不计):
@Transactional( timeout = 2 ) public void transfer(String in,String out,double amount) throws InterruptedException { logger.info("转账方法执行,in:{},out:{},amout:{}",in,out,amount); Account outAccount = accountDao.findByHolder(out); if(outAccount.getBalance()<amount) { throw new RuntimeException("余额不足! "); } //转进账户增加amount accountDao.updateByHolder(in, amount); //转出账户减少amount accountDao.updateByHolder(out, -1*amount); Thread.sleep(2000L); } - spring事务管理默认只有运行时异常才会导致事务回滚,即当异常对象是RuntimeException和它的子类被抛出时才会导致事务回滚,对于编译时异常,也就是checked exception,不会导致事务回滚。比如下面的事务方法不会让事务回滚:
//受检查异常默认不会导致事务回滚 @Transactional public void checkedException() throws FileNotFoundException { accountDao.updateByHolder("Tom", 99999L); //这是一个不存在的文件 FileInputStream fis = new FileInputStream("asdasd.xxxd"); } - propagation会影响嵌套事物的属性,比如在事务方法txA()中进行了事务方法txB()的调用,如果txB()的@Transactional的propogation为默认的REQUIRE(即txB的事务会加入到txA的事务中),那么txB()的事务属性会使用大事务的属性。
1.2.3. AOP原理
1.2.3.1. @EnableAspectJAutoProxy
这个注解开启自动代理功能,它Import一个AspectJAutoProxyRegistrar.class,
AspectJAutoProxyRegistrar类实现ImportBeanDefinitionRegistrar接口,实现了registerBeanDefinitions()方法:
class AspectJAutoProxyRegistrar implements ImportBeanDefinitionRegistrar {

	/**
	 * Register, escalate, and configure the AspectJ auto proxy creator based on the value
	 * of the @{@link EnableAspectJAutoProxy#proxyTargetClass()} attribute on the importing
	 * {@code @Configuration} class.
	 */
	@Override
	public void registerBeanDefinitions(
			AnnotationMetadata importingClassMetadata, BeanDefinitionRegistry registry) {

        //注册一个BeanDefinition
		AopConfigUtils.registerAspectJAnnotationAutoProxyCreatorIfNecessary(registry);


        //获取EnableAspectJAutoProxy注解的属性值,即proxyTargetClass和exposeProxy,做对应的后续操作
		AnnotationAttributes enableAspectJAutoProxy =
				AnnotationConfigUtils.attributesFor(importingClassMetadata, EnableAspectJAutoProxy.class);
		if (enableAspectJAutoProxy.getBoolean("proxyTargetClass")) {
			AopConfigUtils.forceAutoProxyCreatorToUseClassProxying(registry);
		}
		if (enableAspectJAutoProxy.getBoolean("exposeProxy")) {
			AopConfigUtils.forceAutoProxyCreatorToExposeProxy(registry);
		}
	}

}
这个类的主要操作就是:
- 向IOC容器注册一个bean,id为internalAutoProxyCreator,class为
org.springframework.aop.aspectj.annotation.AnnotationAwareAspectJAutoProxyCreator - 获取@EnableAspectJAutoProxy注解的属性值,根据属性值执行后续操作。
1.2.3.2. AnnotationAwareAspectJAutoProxyCreator的创建
这个类的继承关系如下:
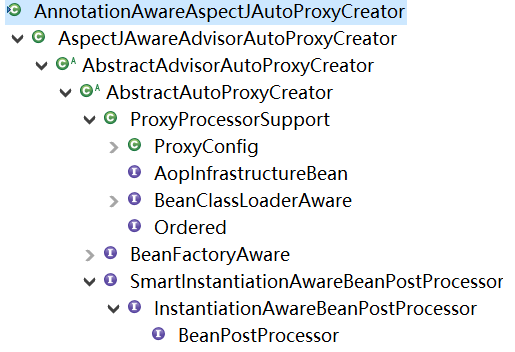
由于这个类实现了BeanPostProcessor接口,因此在IOC容器refresh()时在registerBeanPostProcessors(beanFactory)时这个类就会被实例化并注册到BeanPostProcessors中。
org.springframework.context.support.PostProcessorRegistrationDelegate.registerBeanPostProcessors(ConfigurableListableBeanFactory, AbstractApplicationContext):
......
// Next, register the BeanPostProcessors that implement Ordered.
		List<BeanPostProcessor> orderedPostProcessors = new ArrayList<BeanPostProcessor>();
		for (String ppName : orderedPostProcessorNames) {
			//internalAutoProxyCreator在这里实例化并初始化
            BeanPostProcessor pp = beanFactory.getBean(ppName, BeanPostProcessor.class);
			orderedPostProcessors.add(pp);
			if (pp instanceof MergedBeanDefinitionPostProcessor) {
				internalPostProcessors.add(pp);
			}
		}
......
由于AnnotationAwareAspectJAutoProxyCreator实现了BeanPostProcessor接口,因此它就是一个Bean后置处理器,用来对切面类和目标类进行操作。
1.2.3.3. aop中代理对象的创建和方法的执行
上面提到使用@EnableAspectJAutoProxy的作用是往IOC容器中注册一个BeanPostProcessor,它主要在bean的初始化后起作用,它会在容器创建bean实例并初始化后,根据某个bean是否有对应的增强方法来确定是否生成该bean的代理对象,如果有,则使用代理对象代理该bean实例(目标对象被封装到代理对象中)。
spring aop在生成某个类的代理对象实例时会根据该类是否有接口来决定使用jdk动态代理还是cglib动态代理:
- 如果类实现了接口,则使用jdk动态代理,代理对象实现该类实现的所有接口。
- 如果类没有实现任何接口,则使用cglib动态代理,代理类派生自目标类。
创建代理对象的逻辑在org.springframework.aop.framework.ProxyCreatorSupport.createAopProxy():
@Override
public AopProxy createAopProxy(AdvisedSupport config) throws AopConfigException {
    if (config.isOptimize() || config.isProxyTargetClass() || hasNoUserSuppliedProxyInterfaces(config)) {
        Class<?> targetClass = config.getTargetClass();
        if (targetClass == null) {
            throw new AopConfigException("TargetSource cannot determine target class: " +
                    "Either an interface or a target is required for proxy creation.");
        }
		//目标类有接口或者派生自Proxy,使用Jdk动态代理
        if (targetClass.isInterface() || Proxy.isProxyClass(targetClass)) {
            return new JdkDynamicAopProxy(config);
        }
        return new ObjenesisCglibAopProxy(config);
    }
    else {
        return new JdkDynamicAopProxy(config);
    }
}