- 1. Spring boot
1. Spring boot
1.1. 介绍
spring boot是spring官方为简化spring项目的构建和配置,以“约定大于配置”为原则而开发的一个Spring高层应用。使用spring boot,不需要给出任何配置即可快速开发运行一个spring项目。
1.2. 入门
1.2.1. hello
使用spring boot开发spring项目的步骤如下(以maven工程为例):
- 设置pom.xml的
<parent></parent>元素<parent> <groupId>org.springframework.boot</groupId> <artifactId>spring-boot-starter-parent</artifactId> <version>2.0.1.RELEASE</version> </parent> - 导入项目所需的依赖,这些依赖一般是单独用于boot应用,如web工程,只需要导入一个spring-boot-starter-web依赖。
- 创建boot引导类,调用
SpringApplication.run()启动项目,这个方法返回一个ConfigurableApplicationContext类型的上下文对象。@SpringBootApplication(scanBasePackages = {"com.hb.contoller"}) public class MainApplication { public static void main(String[] args) { SpringApplication.run(MainApplication.class,args); } }注意:Spring boot的启动引导类一般放在和源码中其他的包同级目录下,则引导类的
@SpringBootApplication注解可以不需配置包扫描,否则需要配置扫描的包。
1.2.2. boot项目打包成可执行jar包
- 在pom.xml中引入相关插件
<plugins> <plugin> <groupId>org.springframework.boot</groupId> <artifactId>spring-boot-maven-plugin</artifactId> </plugin> </plugins> - mvn package
java -jar 文件名称执行
1.3. spring boot特性
1.3.0.1. 依赖管理
-
spring-boot-dependencies
每个spring boot项目都要继承spring-boot-starter-parent,这个项目是用来管理插件和配置文件的,而它继承了spring-boot-dependencies项目,这个项目才是SpringBoot用来做依赖管理的,它里面定义了spring项目主流的依赖版本(不引入依赖,只是定义依赖的版本,不同的SpringBoot版本定义的依赖版本可能不同)。 -
starter
如果要在项目中引入相关依赖,只需要引入springboot为不同的功能定义的starter就能完成依赖引入的功能,项目名诸如spring-boot-starter-*的项目都是springboot官方提供的启动依赖,比如web项目引入spring-boot-starter-web,就能把web相关的依赖引入,如spring容器、springmvc、内置tomcat等。
1.3.0.2. 自动配置
springboot对所有的组件都有一份默认的配置,初始不需要任何配置就能正常启动springboot项目,如果需要自定义配置,只需要在项目资源文件夹下创建application.*(后缀可以是propeties、yml或yaml),在配置文件中声明对应的参数就可以让项目中的组件以自定义参数运行。
1.3.0.3. 自动配置原理
SpringBoot是如何不需要手动写配置文件而进行自动进行组件配置的呢? 要搞懂这个机制,需要了解两个东西:
- 条件装配
SpringBoot中有很多条件注解,它们用来根据对应的条件向IOC容器中注册组件,这些条件注解可以用在配置类上或者配置类中的@Bean方法上。 - 配置类(即有
@Configuration标注的类)
有了配置类,随后需要考虑的就是如何让这些配置类生效,如果是在自己的项目中,只需要配置类标注了@Configuration在包扫描路径下就可以注册。 但如果是第三方组件呢?难道需要记住所有第三方组件配置类的包路径吗?在Spring中,也有办法——使用@Import注解来导入,@Import注解可以用来向容器中注册指定的类,包括@Configuration标注的类ImportSelector的实现类ImportBeanDefinitionRegistrar的实现类- 常规的组件类,比如@Component标注的类
了解上面两个东西后(其实是第二种),看看Spring Boot是怎么导入第三方组件的配置类的?
通常情况下我们在Spring Boot项目启动类上加上@SpringBootApplication,执行main(String[] args)方法来启动项目。
@SpringBootApplication这个注解是一个复合注解,它被几个其他的注解标注:
@Target(ElementType.TYPE)
@Retention(RetentionPolicy.RUNTIME)
@Documented
@Inherited
@SpringBootConfiguration
@EnableAutoConfiguration
@ComponentScan(excludeFilters = { @Filter(type = FilterType.CUSTOM, classes = TypeExcludeFilter.class),
		@Filter(type = FilterType.CUSTOM, classes = AutoConfigurationExcludeFilter.class) })
public @interface SpringBootApplication {

	@AliasFor(annotation = EnableAutoConfiguration.class)
	Class<?>[] exclude() default {};


	@AliasFor(annotation = EnableAutoConfiguration.class)
	String[] excludeName() default {};


	@AliasFor(annotation = ComponentScan.class, attribute = "basePackages")
	String[] scanBasePackages() default {};


	@AliasFor(annotation = ComponentScan.class, attribute = "basePackageClasses")
	Class<?>[] scanBasePackageClasses() default {};


	@AliasFor(annotation = ComponentScan.class, attribute = "nameGenerator")
	Class<? extends BeanNameGenerator> nameGenerator() default BeanNameGenerator.class;

	@AliasFor(annotation = Configuration.class)
	boolean proxyBeanMethods() default true;
}
除了元注解,它还被三个注解标注@SpringBootConfiguration、@EnableAutoConfiguration和@ComponentScan,而@EnableAutoConfiguration就是Spring Boot用来进行自动装配的注解。
1.3.0.3.1. @EnableAutoConfiguration
@Target(ElementType.TYPE)
@Retention(RetentionPolicy.RUNTIME)
@Documented
@Inherited
@AutoConfigurationPackage
@Import(AutoConfigurationImportSelector.class)
public @interface EnableAutoConfiguration {

	/**
	 * Environment property that can be used to override when auto-configuration is
	 * enabled.
	 */
	String ENABLED_OVERRIDE_PROPERTY = "spring.boot.enableautoconfiguration";

	/**
	 * Exclude specific auto-configuration classes such that they will never be applied.
	 * @return the classes to exclude
	 */
	Class<?>[] exclude() default {};

	/**
	 * Exclude specific auto-configuration class names such that they will never be
	 * applied.
	 * @return the class names to exclude
	 * @since 1.3.0
	 */
	String[] excludeName() default {};

}
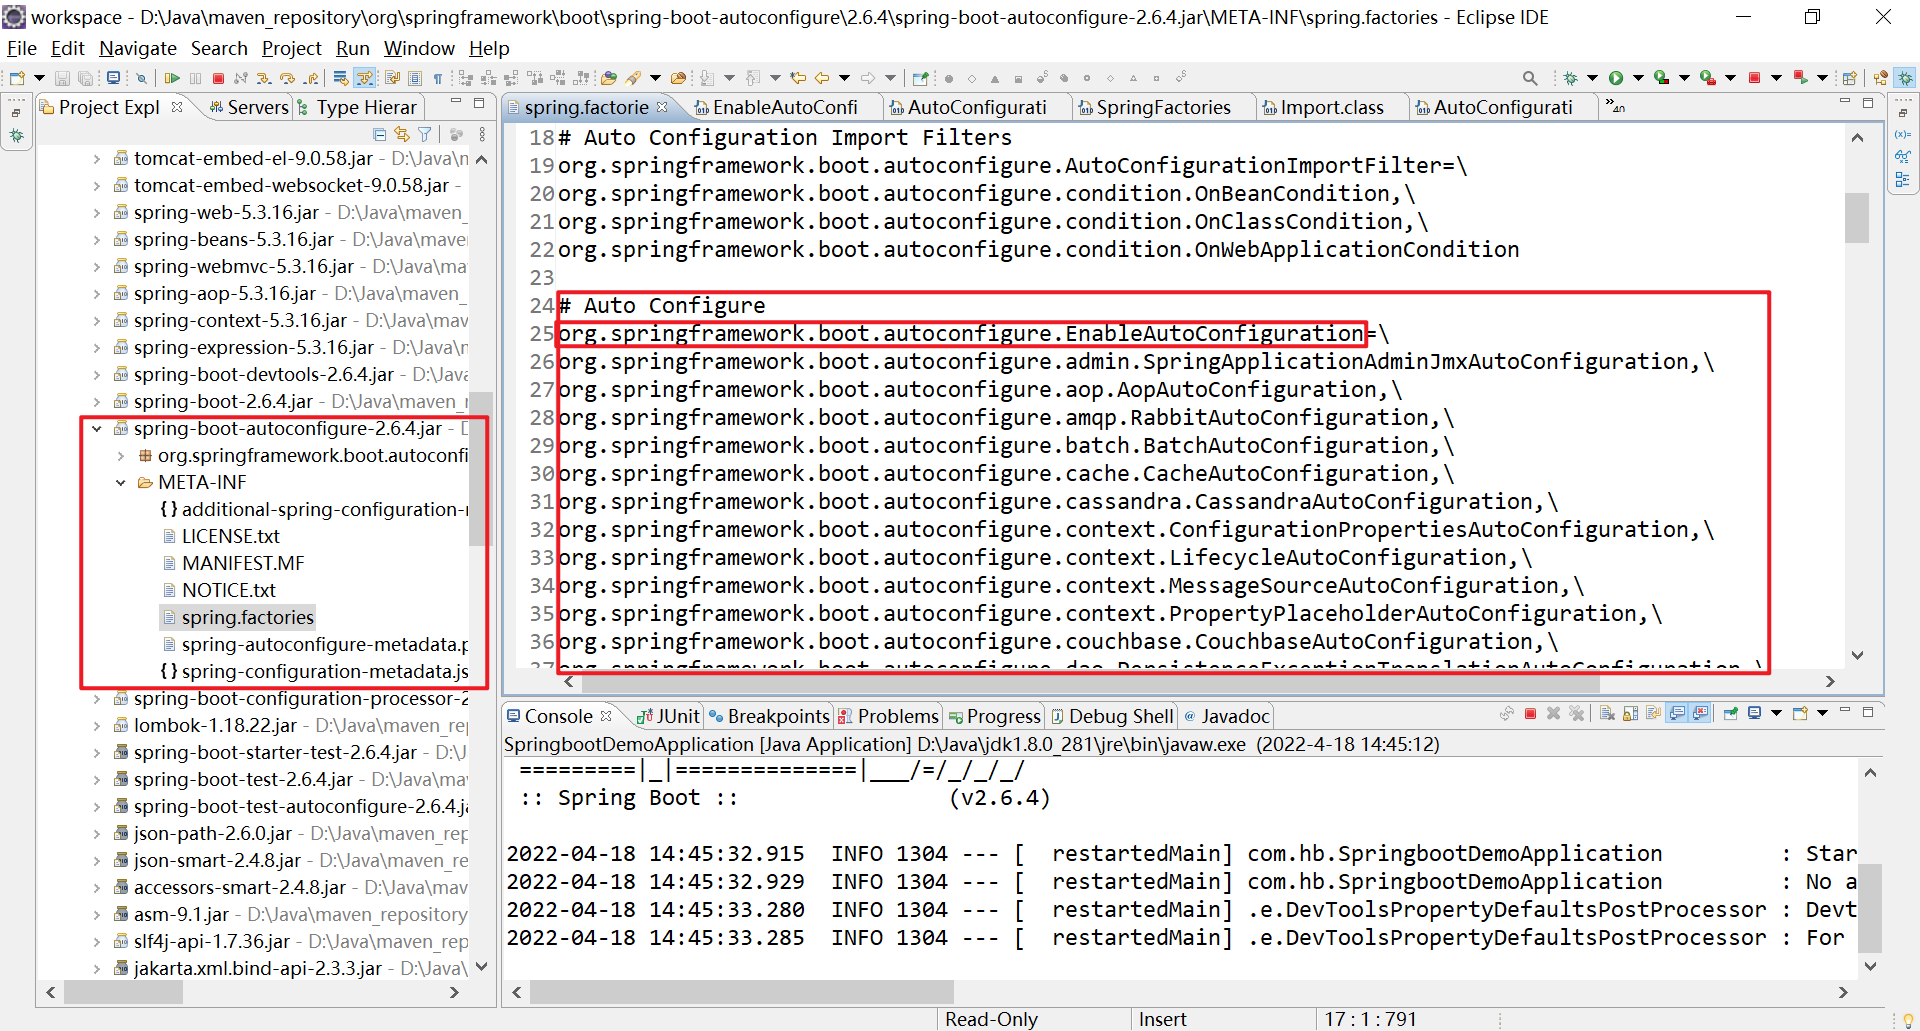
可以看到这个注解也是一个复合注解,除了元注解,还有两个注解,@AutoConfigurationPackage和@Import(AutoConfigurationImportSelector.class),后者是自动装配的核心,AutoConfigurationImportSelector.class中会调用SpringFactoriesLoader.loadFactoryNames()方法加载项目中所有依赖的META-INF/spring.factories文件,并且读取其中配置的所有EnableAutoConfiguration为key的全类名,即告诉spring要导入这些配置类,最终实现各种Bean的注册。
org.springframework.boot.autoconfigure.AutoConfigurationImportSelector.getCandidateConfigurations(AnnotationMetadata, AnnotationAttributes):
protected List<String> getCandidateConfigurations(AnnotationMetadata metadata, AnnotationAttributes attributes) {
		List<String> configurations = SpringFactoriesLoader.loadFactoryNames(getSpringFactoriesLoaderFactoryClass(),
				getBeanClassLoader());
		Assert.notEmpty(configurations, "No auto configuration classes found in META-INF/spring.factories. If you "
				+ "are using a custom packaging, make sure that file is correct.");
		return configurations;
	}
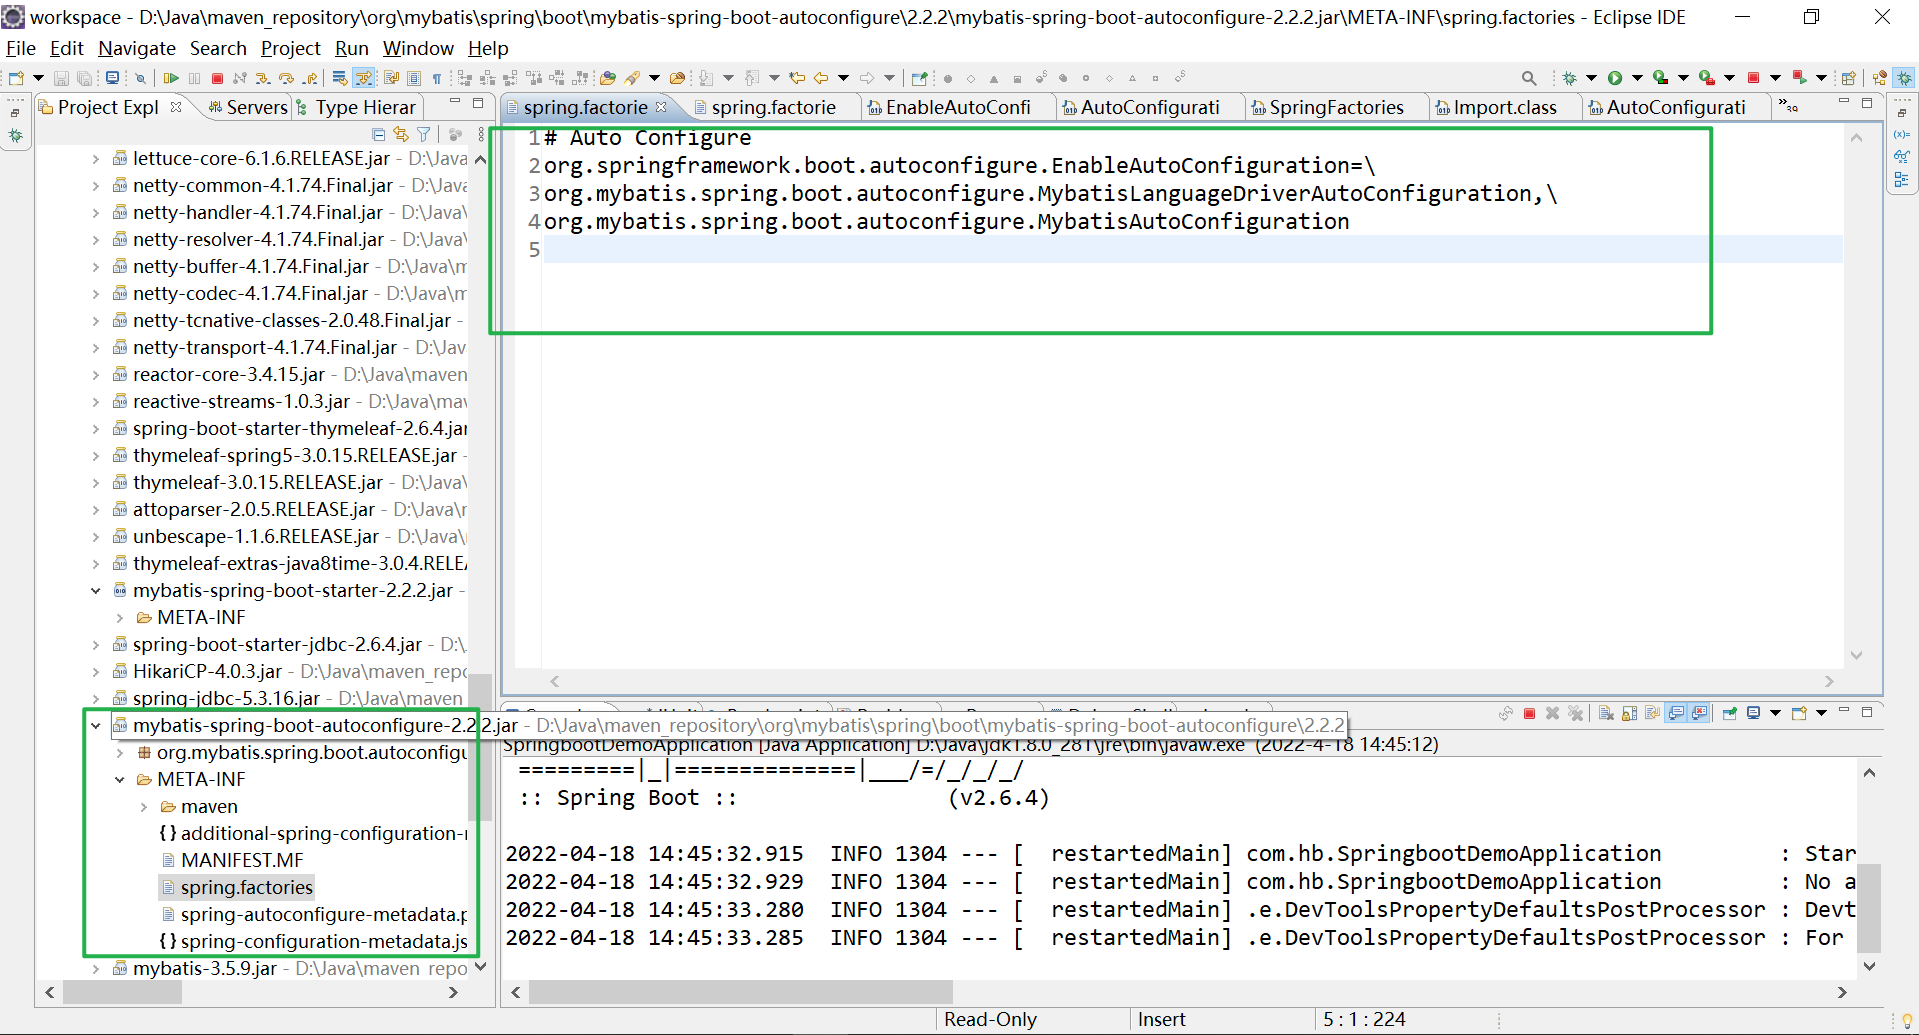
Spring Boot就是使用META-INF/spring.factories这个约定来规定第三方的spring boot starter在文件中声明配置类的位置,然后只要项目中导入了某个组件的starter,Spring Boot就能将配置类注册到容器中。 比如spring-boot-autoconfigure包下的META-INF/spring.factories中就声明了有非常多的EnableAutoConfiguration类:
第三方组件提供的starter比如Mybatis也在mybatis-spring-boot-autoconfigure包下声明了META-INF/spring.factories文件:
1.4. 注解配置
1.4.1. 组件配置
@Configuration:标识一个生产Bean实例的类@Bean:标识返回Bean实例的方法,配置在@Configuration标识的方法中。 注意:如果方法有参数,参数值会自动从上下文容器中获取。@Import:since 3.0. 标识要引入的一个或多个组件类,通常是@Configuration标识的类。也可以是ImportSelector接口、ImportBeanDefinitionRegistrar接口的实现类。如果要引入外部XML文件,请使用@ImportResource注解。@Conditional:Spring提供了Conditional注解用以Bean实例的条件装配,即只有满足注解条件时Bean才会被装配,这个注解不够方便,Spring Boot提供了这个注解的很多派生注解,名称为@ConditionalOnXXX,可以。 注意:条件注解的条件只能匹配到目前为止应用程序上下文处理过的bean定义。强烈建议只在自动配置类上使用该条件。拿@ConditionalOnBean为例,如果候选bean可能由另一个自动配置创建,请确保使用此条件的bean在后面运行。@ImportResource:引入bean definition XML形式配置文件。
1.4.2. 属性绑定(注入)
@ConfigurationProperties:boot提供的注解,可以配和@Component或@Bean使用,作用是为一个组件注入属性值,这个注解告诉boot从application配置文件中找到参数注入当前Bean,前提是这个Bean必须提供getter/setter方法。注解必须配置一个prefix指定参数前缀。 例子:#application.properties中自定义属性值 usr.id=1 usr.name=solitaryclown@Configuration public class ComponentConfiguration { @Bean("user") @ConfigurationProperties(prefix = "usr") public User user(){ return new User(); } }在项目启动后,user组件会被自动注入参数值。
@EnableConfigurationProperties(Class<?>[] value()):如果@ConfigurationProperties注解定义在类上,则要么配合组件注解如@Component,要么使用使用此注解使生效。如果bean没有声明组件注解,意味着不会被装配到IOC容器,但此注解可以让bean自动装配到容器并进行属性注入。此注解可以声明在启动类上,一般是用于非本项目组件的属性注入。
1.4.2.1. boot是怎么自动装配组件的?
-
组件装配 org.springframework.boot.autoconfigure包是boot自动装配的核心,里面有大量的XXXAutoConfiguration类,用来装配组件,且用了大量的@ConditionalOnXXX进行条件装配。
-
属性值注入 boot将每个组件的属性都抽取出来分别为XXXProperties,且用了
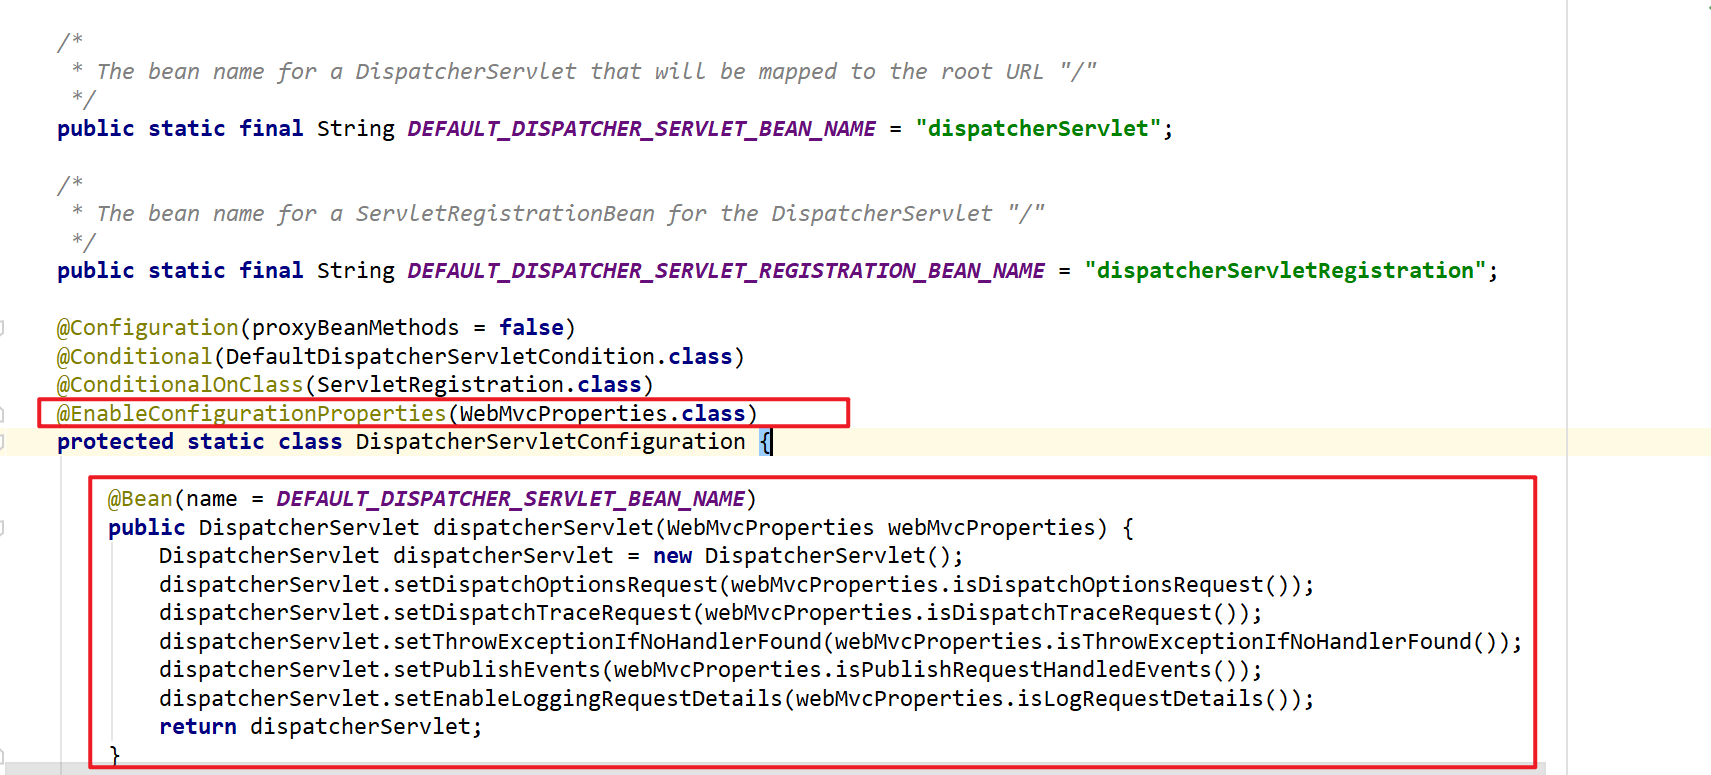
@ConfigurationProperty注解进行属性值和配置文件绑定。 在XXXAutoConfiguration类上使用@EnableConfigurationProperties关联XXXProperties类(这个注解上面说过,有两个作用,一是注册为容器中的bean,二是属性值自动注入),然后在配置类中使用@Bean方法将返回值交给容器,方法的参数一般会带XXXProperties以此获得实例的参数。
1.4.2.2. 例子:spring mvc的DispatcherServlet的自动装配
在传统Spring项目中,需要在web.xml文件中配置MVC的DispatcherServlet;在boot项目中,org.springframework.boot.autoconfigure.web.servlet.DispatcherServletAutoConfiguration这个类提供了DispatcherServlet的装配。
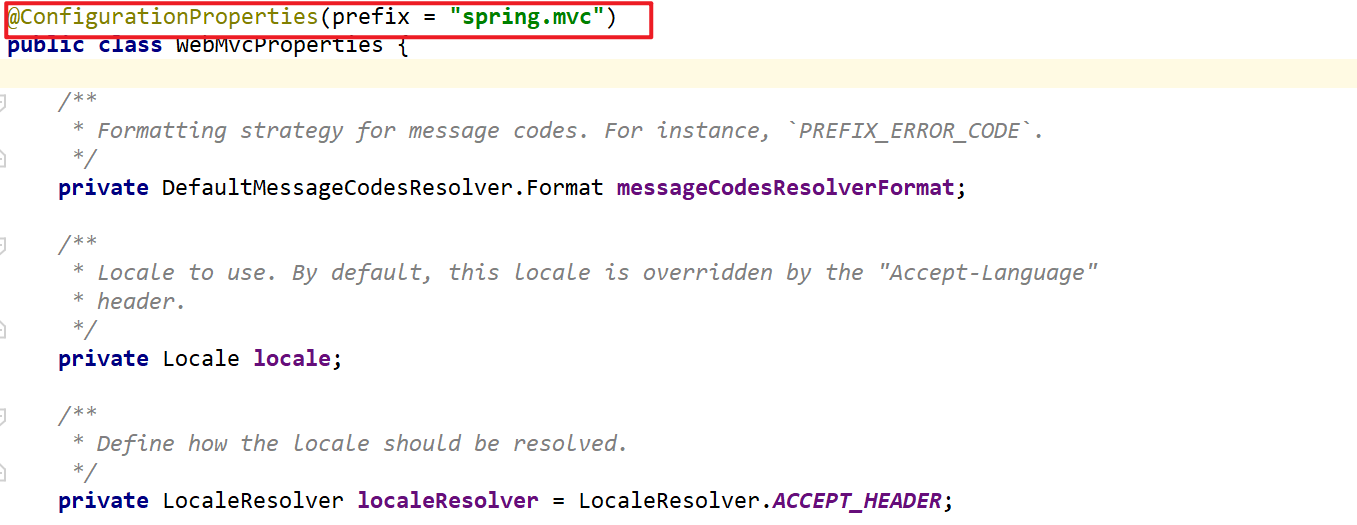
WebProperties类:
TIPS:application.properties中配置:debug=true可以查看Spring boot的debug信息,包括启动后的bean装配信息。
1.5. 配置文件
boot的项目配置文件以application为文件名,后缀可以是propeties或yaml、yml。 在以数据为中心的配置下,使用yml比propertis更简洁。
1.5.1. spring-boot-configuration-processor
spring-boot-configuration-processor是一个注释处理器,它生成应用程序中被@ConfigurationProperties注释的类的元数据。您的IDE (Eclipse、IntelliJ或NetBeans)使用该元数据在编辑应用程序时为属性提供自动完成和文档。 https://stackoverflow.com/questions/53707080/what-is-the-spring-boot-configuration-processor-why-do-people-exclude-librarie
在pom.xml中引入这个依赖可以在配置时智能提示,对项目运行无影响,因此一般在打包时排除这个依赖:
<plugin>
    <groupId>org.springframework.boot</groupId>
    <artifactId>spring-boot-maven-plugin</artifactId>
    <configuration>
        <excludes>
            <exclude>
                <groupId>org.springframework.boot</groupId>
                <artifactId>spring-boot-configuration-processor</artifactId>
            </exclude>
        </excludes>
    </configuration>
</plugin>
1.6. boot开发web项目
1.6.1. 静态资源访问
默认情况下,boot提供了四个存放静态资源的目录:
- /static
- /public
- /resources
- /META-INF/resources
当静态资源放在项目类根目录下的这些目录或者子目录中时,都可以被访问到(如果位于子文件夹要加上子文件夹的名称)。
- 自定义访问路径:
- 自定义静态资源存放目录:
spring:
  mvc:
 #静态资源访问路径
 static-path-pattern: /static/**
  web:
 resources:
 #静态资源存放目录(数组)
   static-locations: ["classpath:/dir/"]
1.6.1.1. 首页
访问boot项目的根路径时,首先在静态资源中寻找index.html作为welcome page
1.6.1.2. icon
命名为favicon.ico,放在静态资源目录下
1.6.2. Restful API请求设置
tomcat原生不支持Restful风格的请求,即只允许GET和POST请求,而Restful风格有多种请求,比如GET、POST、PUT、DELETE等。在浏览器中,from表单请求只有get和post,除Get以外的请求都会自动变成Post请求,如果使用其他的请求方式,,客户端,如果是页面表单请求或者ajax请求,都必须携带一个请求参数,名称为”_method”,值为请求方式,如_method=PUT,服务器端SpringMVC需要配置HiddenMethodFilter来解析这个_method参数,如果是Postman之类的支持8种请求方式的http请求客户端,则不需要配置HiddenHttpMethodFilter了,因为可以请求头直接有请求方式,SpringMVC可以直接获取。 application.yml
spring:
  mvc:
    hiddenmethod:
      filter:
        enabled: true
表单域:
<!-- 表单的method属性必须为post -->
<form action="请求路径" method="post">
    <!--隐藏参数,指定请求方法名-->
    <input type="hidden" name="_method" value="PUT">
    <input type="submit" value="put请求">
</form>
1.6.2.1. 原理
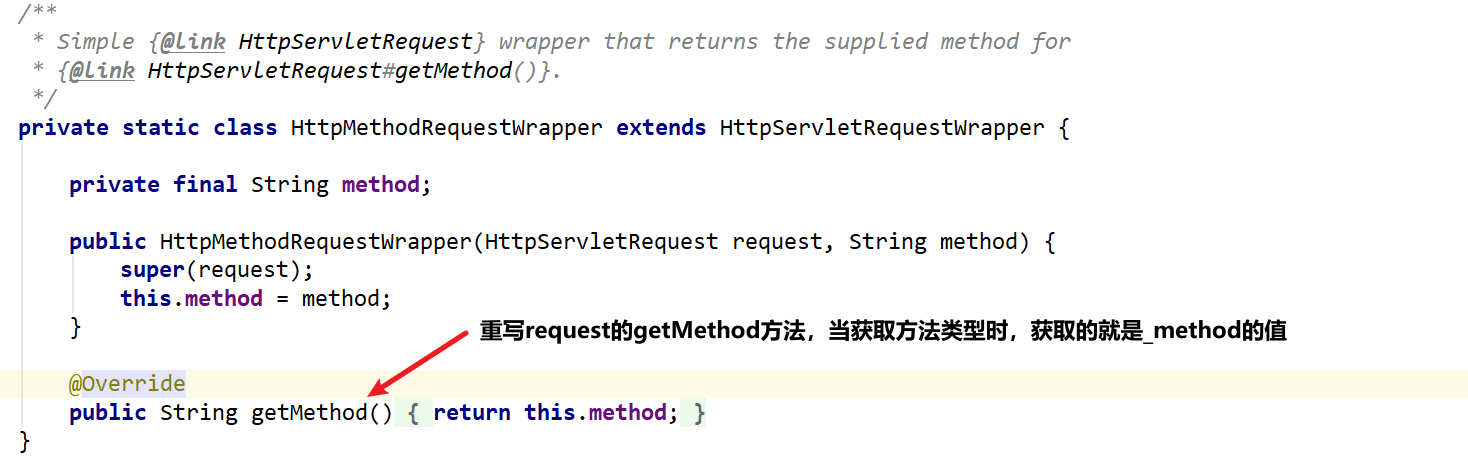
当SpringMVC的HiddenMethodFilter接收到POST请求,会解析其中的_method参数最终把request包装成_method指定请求参数的请求包装类,最终Controller就能通过对应的注解接收不同请求方式的请求。
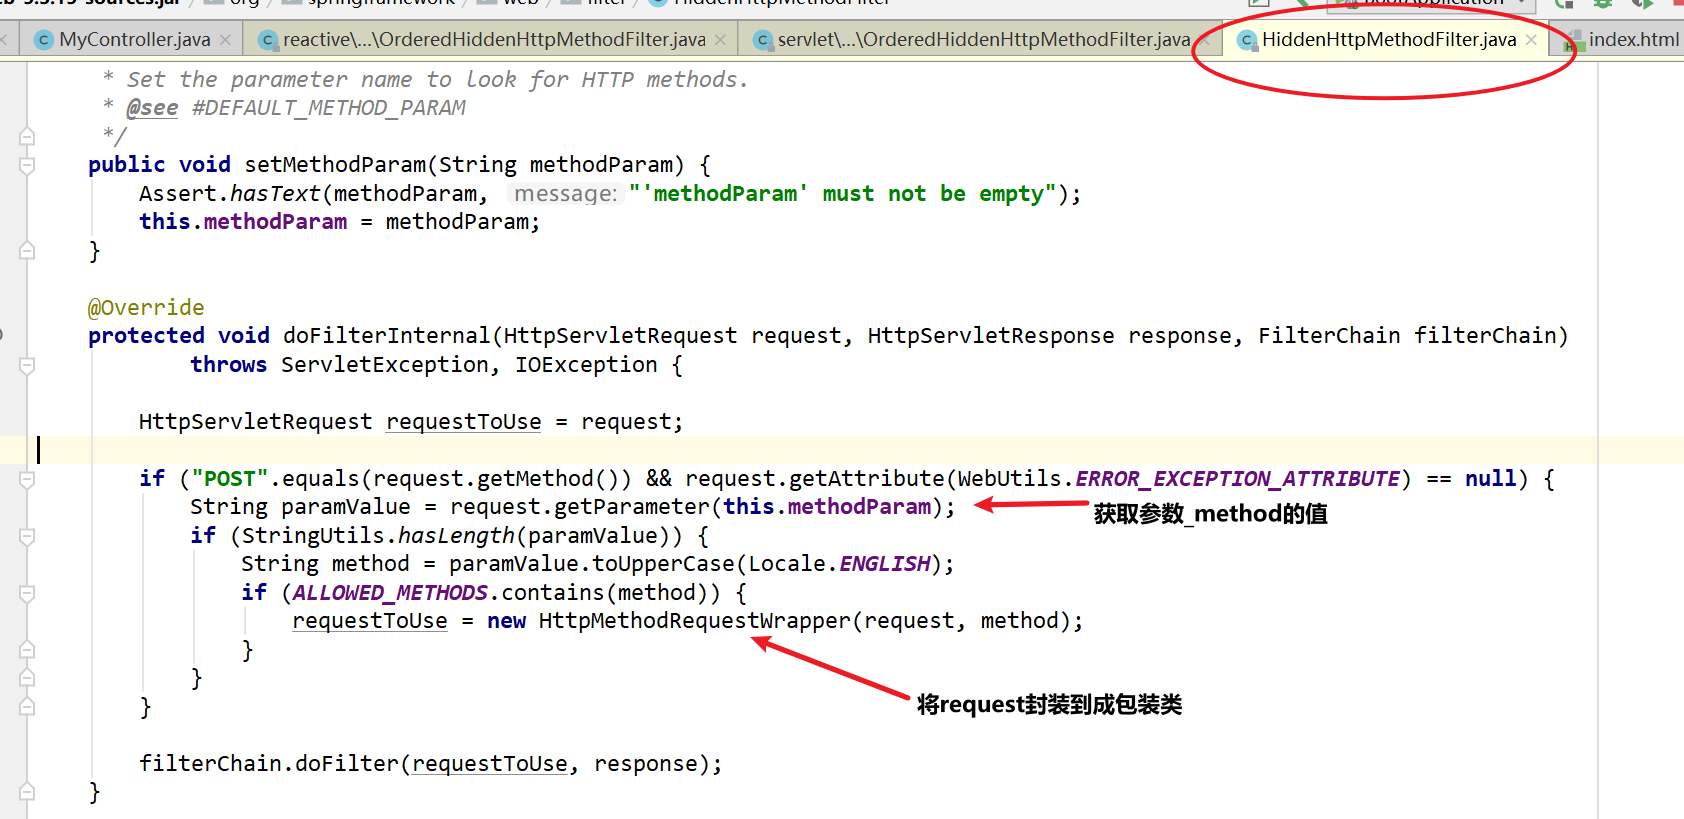
boot自动装配:

在SpringMVC中,请求参数”_method”这个名称是固定的,如果要自定义,可以直接继承HiddenHttpMethodFilter自定义参数名,并且通过父类提供的set方法进行设置:
/**
	 * Set the parameter name to look for HTTP methods.
	 * @see #DEFAULT_METHOD_PARAM
	 */
	public void setMethodParam(String methodParam) {
		Assert.hasText(methodParam, "'methodParam' must not be empty");
		this.methodParam = methodParam;
	}
1.6.3. spring mvc请求映射的原理
spring mvc中的DispatcherServlet类的protected void doDispatch(HttpServletRequest request, HttpServletResponse response)是处理每个请求的方法。
在DispathcerServlet类中有个属性叫handlerMappings,是一个List类型的集合,保存了不同的HandlerMapping对象,在boot项目中,默认有5个HandlerMapping,boot实现welcome-page配置的原理就是实现了一个WelcomePageHandlerMapping:
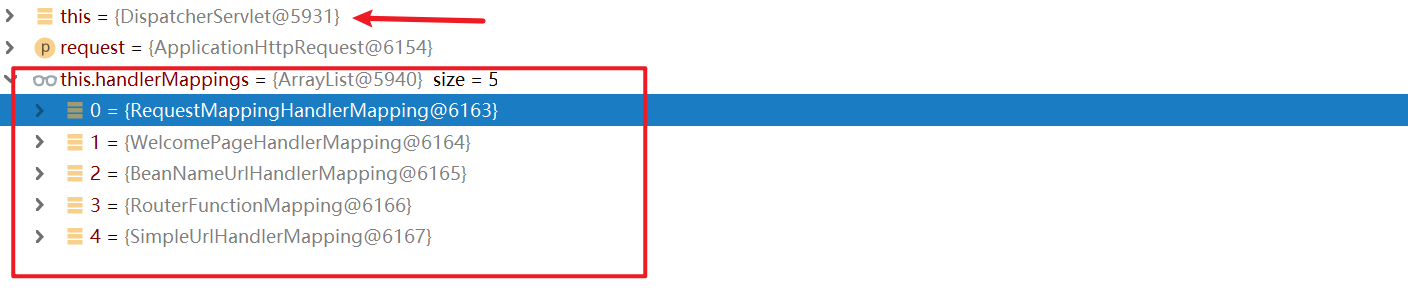
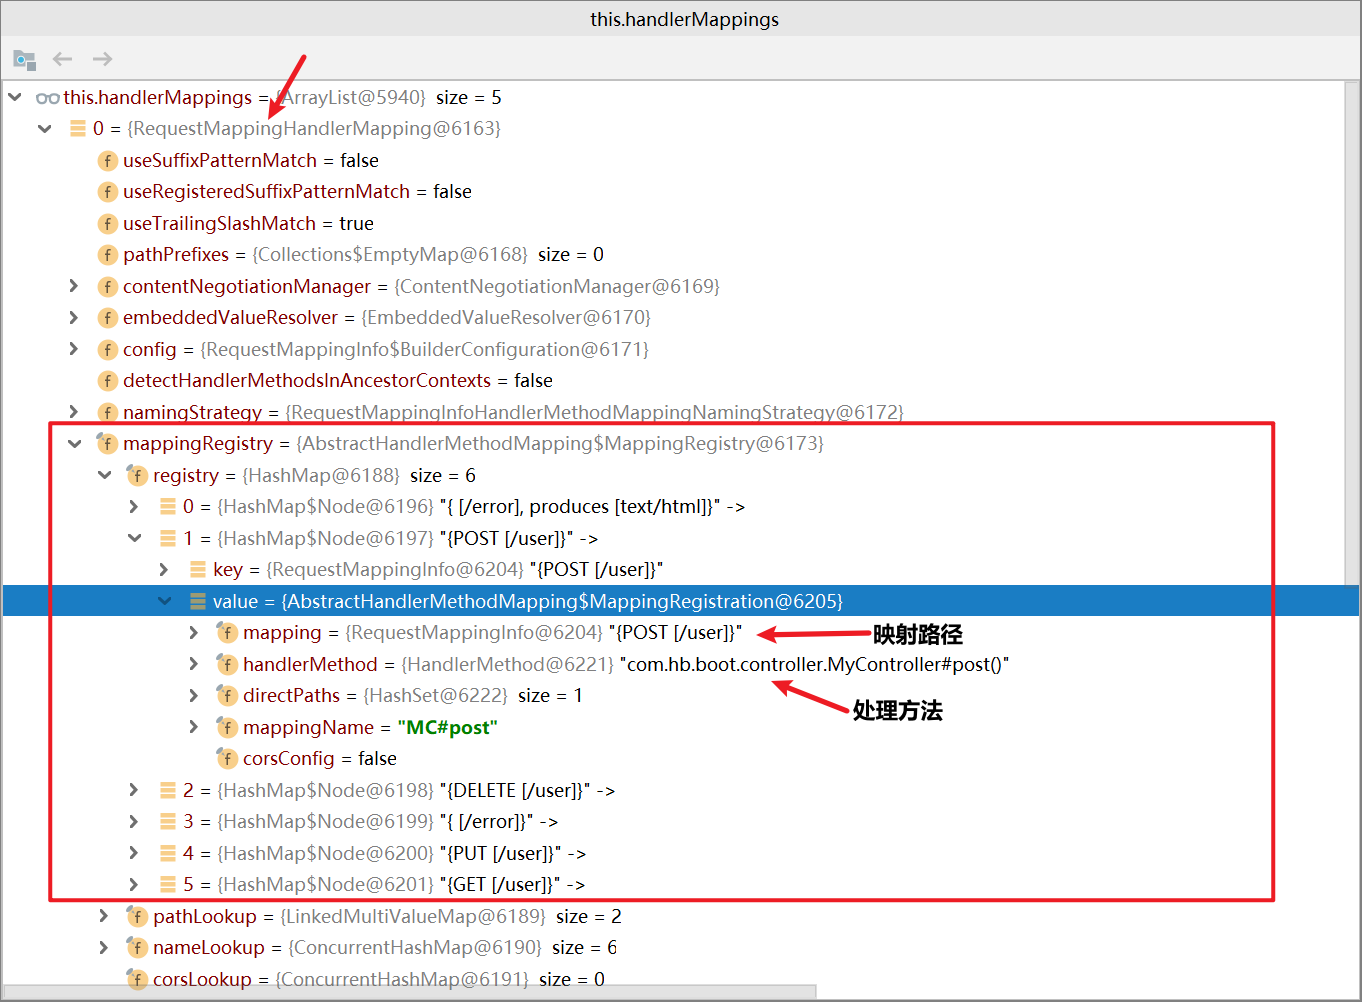
而我们的项目中的Controller中的@RequestMapping方法和映射路径则是注册到了RequestMappingHandlerMapping类中
请求映射的核心流程: DispatcherServet——DS HandlerMapping——HM
DS.doservice()—>DS.doDispatch()—>DS.getHandler()—>HM.getHandler()—>HM.getHandlerInternal()
在boot的自动配置包中,WebMvcAutoConfiguraiton类自动注册了RequestMappingHandlerMapping和WelcomeHandlerMapping:
@Bean
@Primary
@Override
public RequestMappingHandlerMapping requestMappingHandlerMapping(
		@Qualifier("mvcContentNegotiationManager") ContentNegotiationManager contentNegotiationManager,
@Qualifier("mvcConversionService") FormattingConversionService conversionService,
@Qualifier("mvcResourceUrlProvider") ResourceUrlProvider resourceUrlProvider) {
// Must be @Primary for MvcUriComponentsBuilder to work
return super.requestMappingHandlerMapping(contentNegotiationManager, conversionService,
		resourceUrlProvider);

@Bean
public WelcomePageHandlerMapping welcomePageHandlerMapping(ApplicationContext applicationContext,
		FormattingConversionService mvcConversionService, ResourceUrlProvider mvcResourceUrlProvider) {
	WelcomePageHandlerMapping welcomePageHandlerMapping = new WelcomePageHandlerMapping(
			new TemplateAvailabilityProviders(applicationContext), applicationContext, getWelcomePage(),
			this.mvcProperties.getStaticPathPattern());
	welcomePageHandlerMapping.setInterceptors(getInterceptors(mvcConversionService, mvcResourceUrlProvider));
	welcomePageHandlerMapping.setCorsConfigurations(getCorsConfigurations());
	return welcomePageHandlerMapping;
}
如果项目中有需求,可以自定义HandlerMapping类,编写自己的映射处理逻辑。
1.6.4. 请求参数绑定
- @PathVariable:获取请求路径中参数
- @RequestParam:获取GET请求参数,即请求url”?”后面的参数值,如果
- @RequestHeader:获取请求头参数
- @CookiValue:获取某个cookie
- @RequestBody:获取请求体的参数
- @RequestAttribute:获取request域中的数据
- @MatrixVariale:获取矩阵参数,形如/path;age=xxx;like=1,2,3,age和like这里就是MatrixVariable,参数以分号作为分隔符,如果要获取一个MatrixVariable,必须和PathVariable变量进行绑定,从url上来说,一个MatrixVariable是一个PathVariable的一部分,可以看做附属关系。
注意:在SpringMVC中,MatrixVariale默认是不起作用的,因为默认的路径解析器将路径中的分号部分移除了,如果要获取MatrixVariable,要更改WebMvcConfigure,将路径解析器中的分号去除设置为false:
@Configuration
 public class WebMvcConfig {
     @Bean
     public WebMvcConfigurer webMvcConfigurer(){
         return new WebMvcConfigurer() {
             @Override
             public void configurePathMatch(PathMatchConfigurer configurer) {
                 UrlPathHelper helper = new UrlPathHelper();
                 //分号去除设置为false
                 helper.setRemoveSemicolonContent(false);
                 configurer.setUrlPathHelper(helper);
             }
         };
     }
 }
1.6.4.1. MVC参数绑定的原理
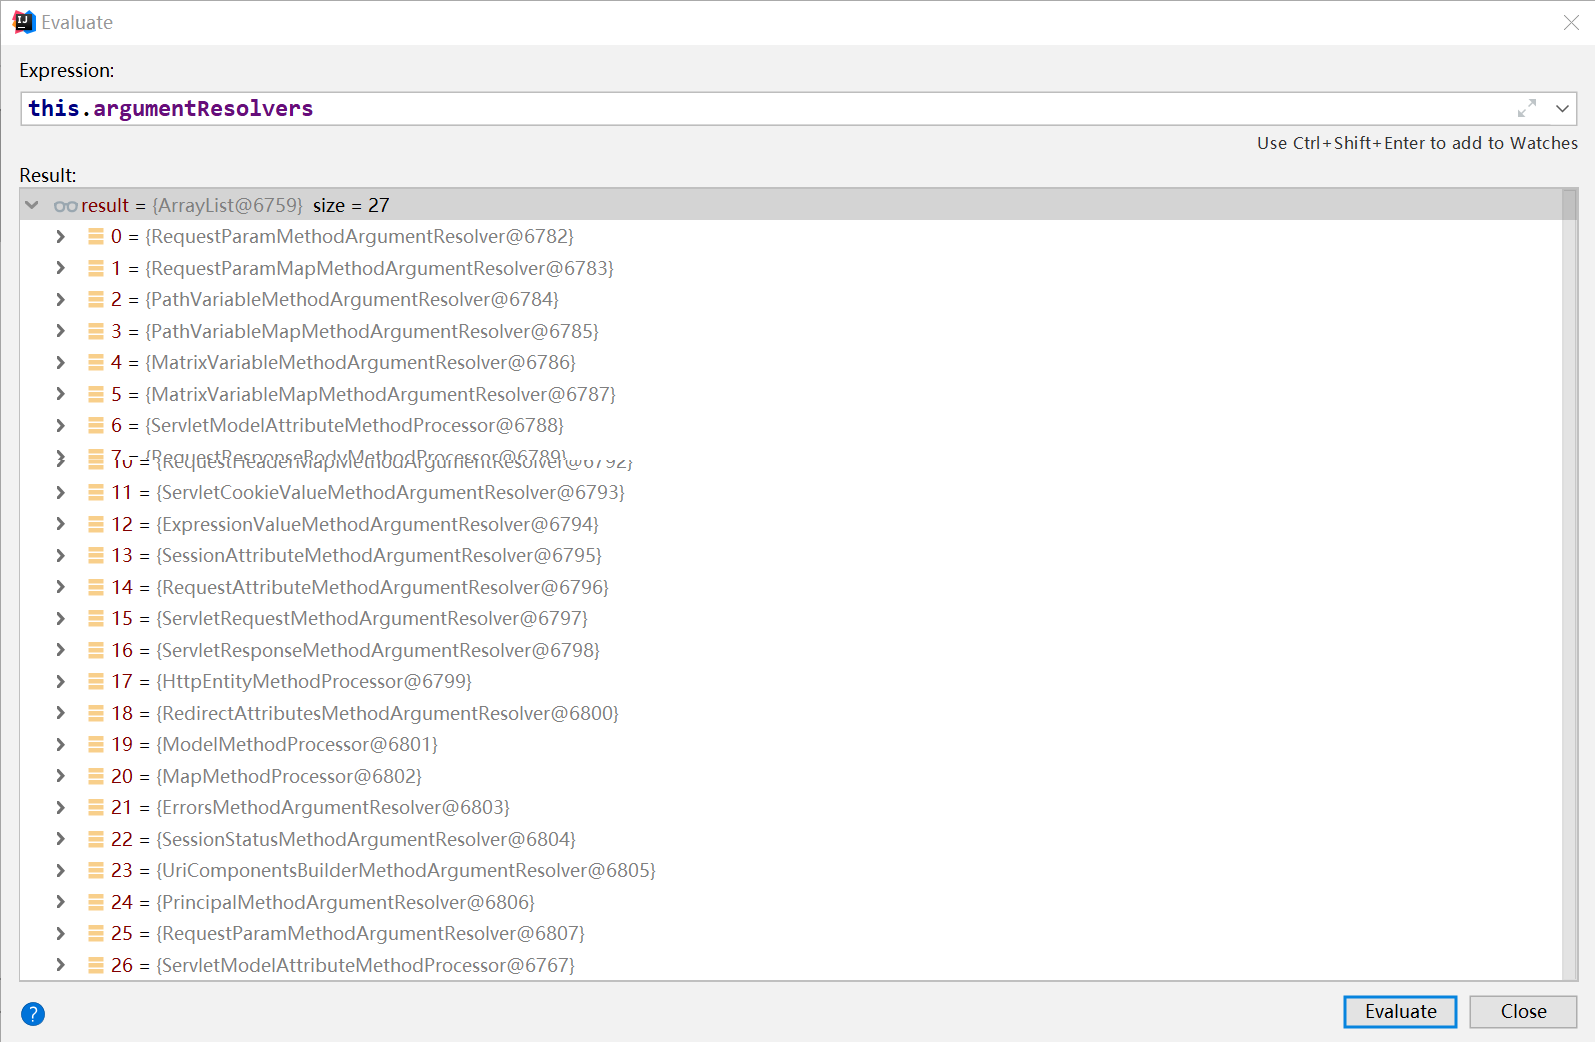
DispatcherServlet.getHandler()—>getHandlerAdapter()—>HA.handle()—>参数解析
MVC参数解析器:
1.6.4.2. 自定义converter
@Slf4j
@Configuration
public class WebMvcConfig {
    @Bean
    public WebMvcConfigurer webMvcConfigurer(){

        return new WebMvcConfigurer() {
             {
                log.info("创建了自定义的WebMvcConfigurer...");
            }
            @Override
            public void configurePathMatch(PathMatchConfigurer configurer) {
                UrlPathHelper helper = new UrlPathHelper();
                helper.setRemoveSemicolonContent(false);
                configurer.setUrlPathHelper(helper);
            }

            @Override
            public void addFormatters(FormatterRegistry registry) {
                log.info("执行了addFormatters()方法..");
                Converter<String, Date> StringToDate = new Converter<String, Date>() {
                    @Override
                    public Date convert(String source) {
                        SimpleDateFormat sdf = new SimpleDateFormat("yyyy-MM-dd");
                        if(!StringUtils.isEmpty(source)){
                            try {
                                return sdf.parse(source);
                            } catch (ParseException e) {
                                e.printStackTrace();
                            }
                        }
                        return null;
                    }
                };
                registry.addConverter(StringToDate);
            }
        };
    }

}
1.6.5. 返回值处理(@ResponseBody)
和参数绑定使用参数解析器一样,SpringMVC会对返回值进行类型判断,找到一个合适的返回值处理器对返回值进行处理。
对于标注了@ResponseBody的方法或者类,方法的返回值由RequestResponseBodyProcessor这个类处理:
@Override
	public void handleReturnValue(@Nullable Object returnValue, MethodParameter returnType,
			ModelAndViewContainer mavContainer, NativeWebRequest webRequest)
			throws IOException, HttpMediaTypeNotAcceptableException, HttpMessageNotWritableException {

		mavContainer.setRequestHandled(true);
		ServletServerHttpRequest inputMessage = createInputMessage(webRequest);
		ServletServerHttpResponse outputMessage = createOutputMessage(webRequest);

		// Try even with null return value. ResponseBodyAdvice could get involved.
		writeWithMessageConverters(returnValue, returnType, inputMessage, outputMessage);
	}
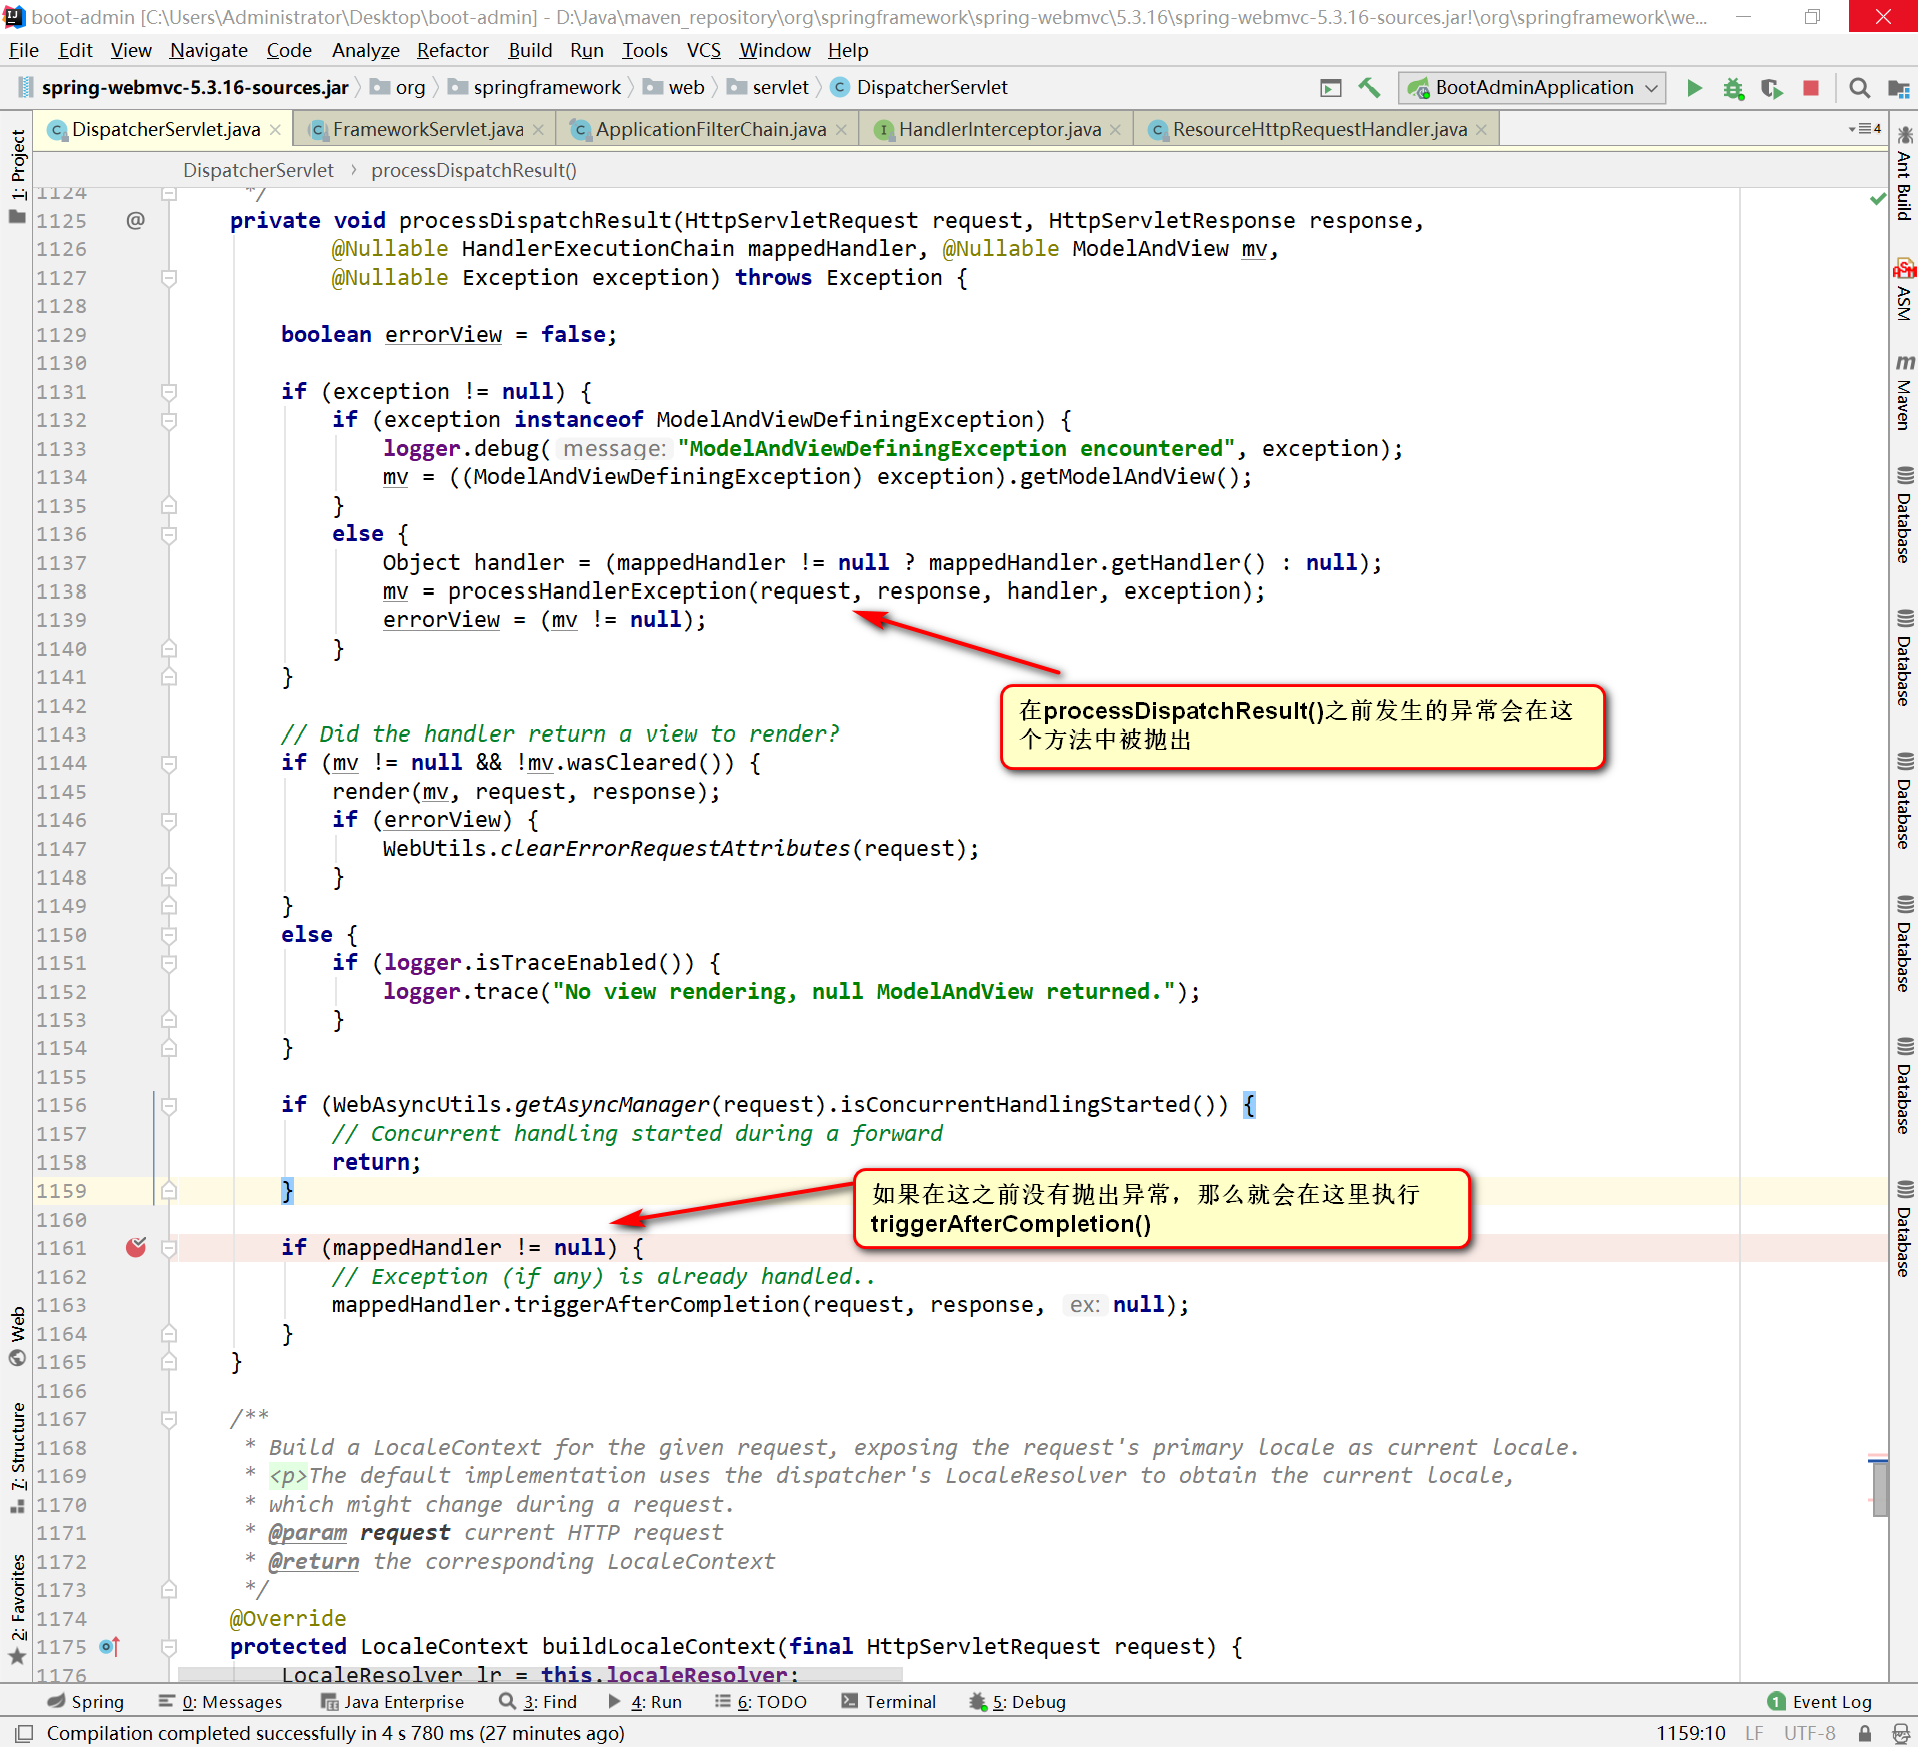
注意:对于@ResponseBody的方法,返回值处理器处理后返回的ModelAndView返回值为null,后面执行processDispatchResult()时不会执行视图解析过程。
1.6.5.1. HttpMessageConverter原理
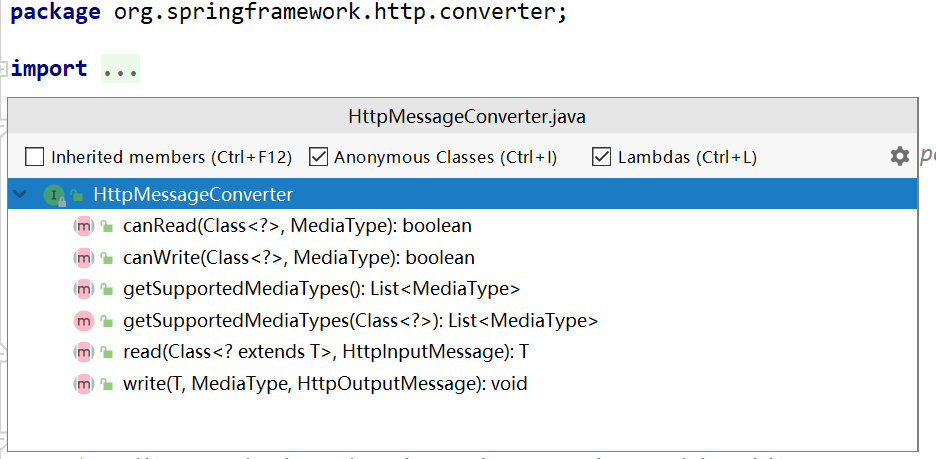 @ResponseBody的返回值由RequestResponseBodyProcessor这个类处理,但核心是由消息转换器将返回值类型转换成MIME类型。
每个HttpMessageConverter实现都有一个或几个相关的MIME类型。当接收到一个新请求时,Spring将使用“Accept”报头来确定它需要响应的媒体类型。然后,它将尝试找到一个能够处理特定媒体类型的注册转换器。
1.6.5.2. 内容协商
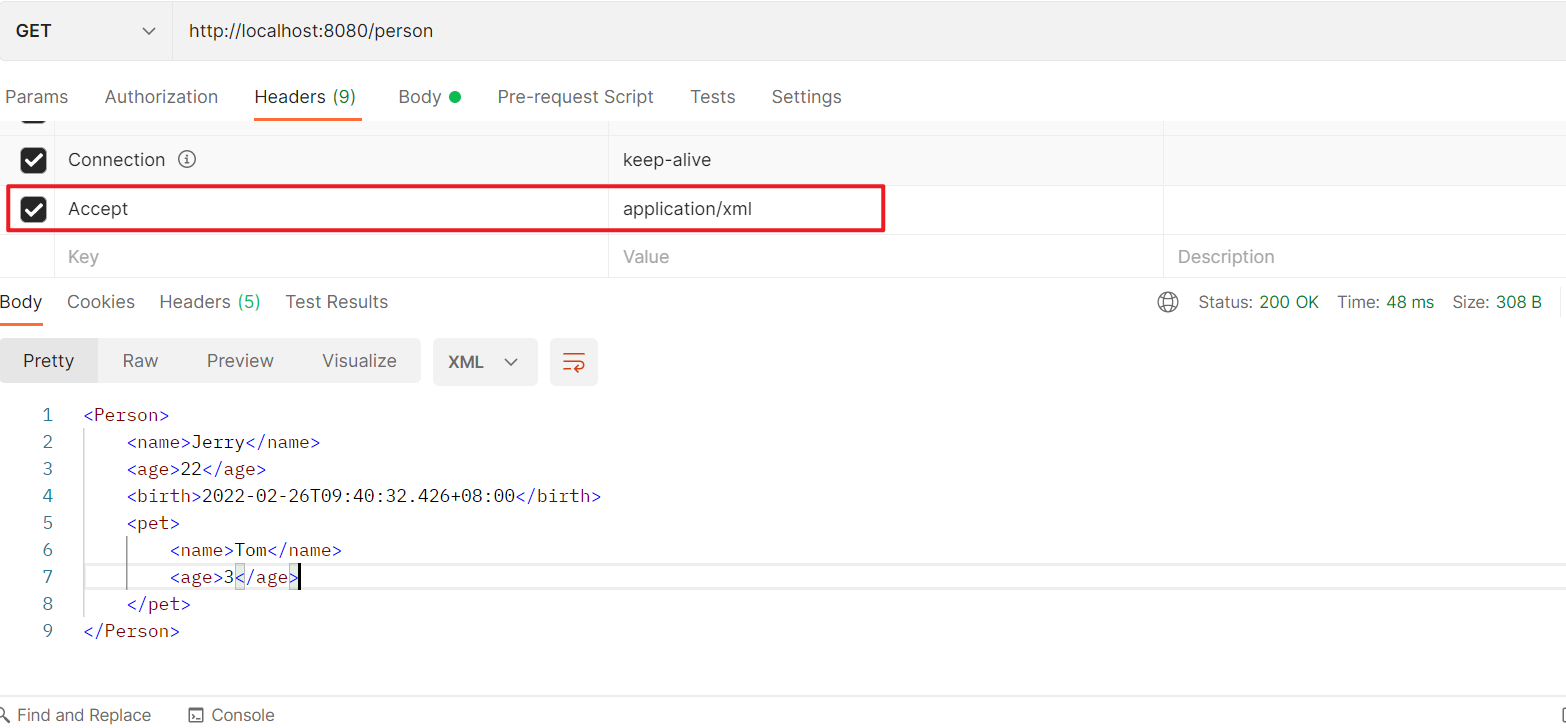
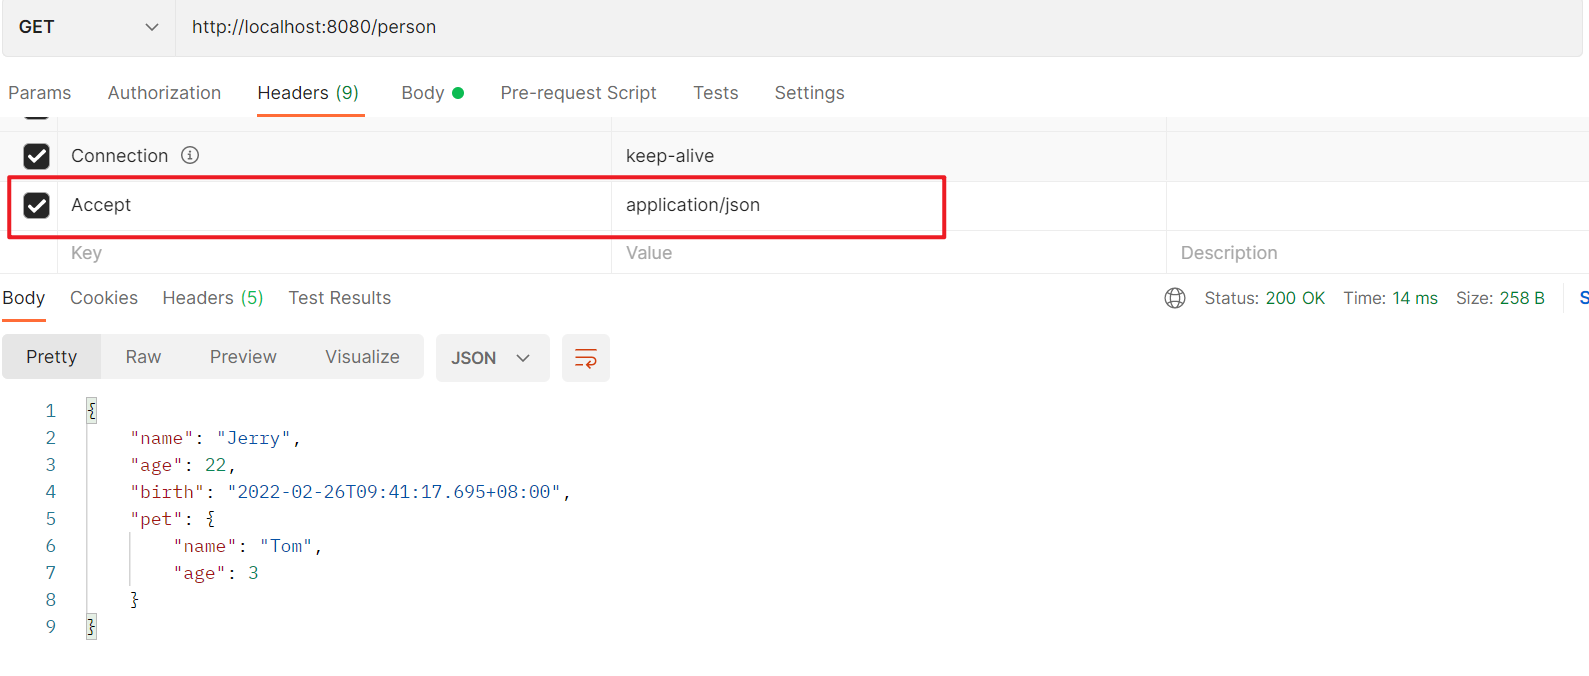
Http请求头中有一个参数Accept,指定了客户端想要接收的响应数据的MIME类型:

服务器接收到响应后,响应客户端需要的最佳的MIME类型就叫内容协商。 SpringMVC很好地支持了内容协商机制,它是在Controller的方法执行之后,响应返回之前执行的,它的过程是这样的:
- 判断响应头是否已经设置MIME类型
- 获取request的Accept字段,查看客户端支持的响应数据类型
- 遍历所有的messageConverter,看哪个消息转换器支持当前方法的返回值类型的处理 如果某个messageConverter支持当前返回值类型的处理,记录这个消息转换器支持的所有MIME类型。(加入一个List)
- 根据某些策略选择一个最佳的消息转换器进行消息转换。
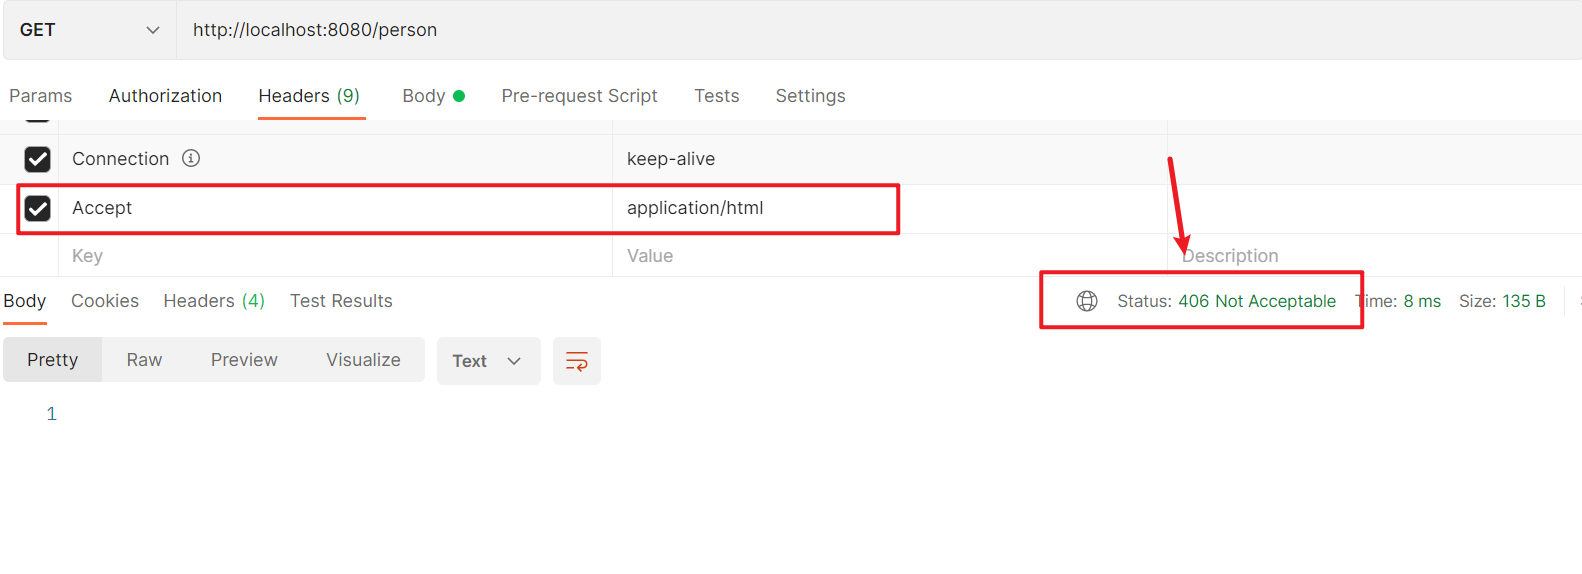
如果项目中同时导入了xml和json的消息转换器依赖且如果http客户端的Accept中xml比json权重高,MVC会使用消息转换器将返回值序列化为XML形式的数据最终响应给客户端,而如果服务器没有客户端请求的MIME类型,会返回406——Not Acceptable:
1.6.5.2.1. 内容协商策略
在服务器进行内容协商时,会使用一个策略管理器ContentNegotiationManager,策略管理器会遍历所有的内容协商策略类(ContentNegotiationStrategy)来获取此次http请求需要的响应数据的MIME类型。
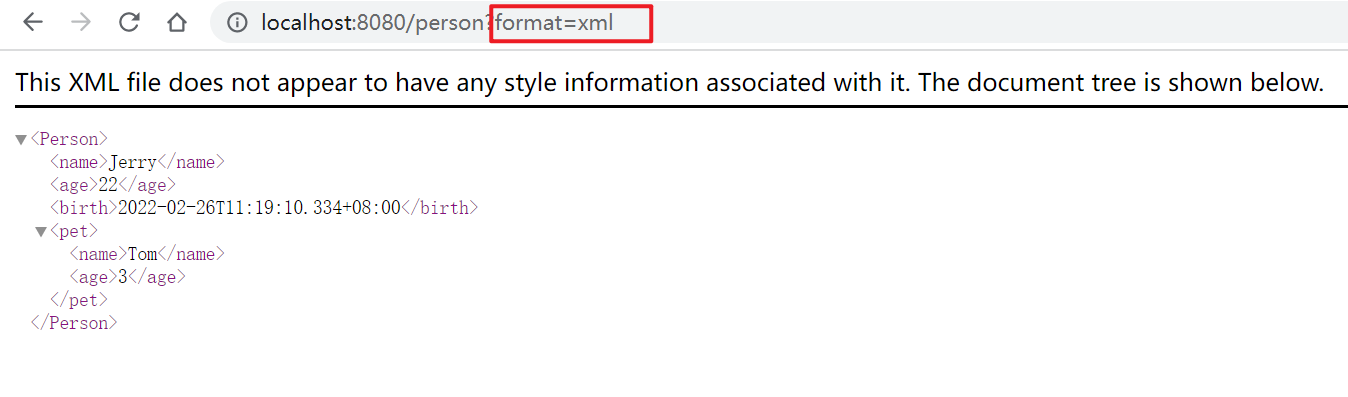
内容协商策略即服务器判断请求内容的依据,SpringMVC提供了多种内容协商策略,默认是按照http请求头的Accept参数来进行响应类型的选择,即HeaderContentNegotiationStrategy,此外,SpringMVC还有一种策略叫参数内容协商策略:ParameterContentNegotiationStrategy,如果使用内容协商策略,那么在http请求时需要携带一个参数“format”,它的值是请求需要的MIME类型,服务器会根据参数协商策略获取format的值得到http请求需要的MIME类型,从而响应数据。
ParameterContentNegotiationStrategy默认是不启用的,如果要开启,设置spring.mvc.contentnegotiation.favor-parameter=true

1.6.5.2.2. 自定义messageConverter
1.6.6. 返回值处理(视图名)
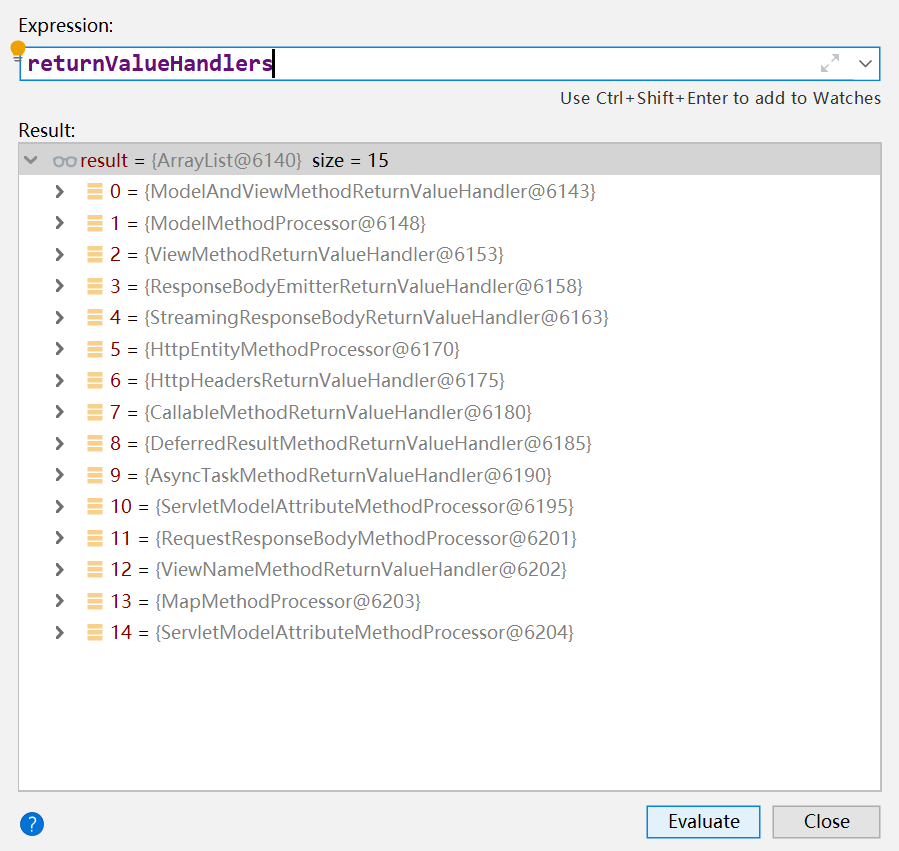
前面提到SpringMVC会根据Controller方法的返回值类型,寻找合适的返回值处理器进行处理,SpringMVC共有15种返回值处理器:
前面提到了SpringMVC对于标注了@ResponseBody的方法的返回值的处理,现在谈谈返回视图名的处理。 ViewNameMethodReturnValueHandler用来处理没有标注@ResponseBody且返回一个String类型的返回值的方法。
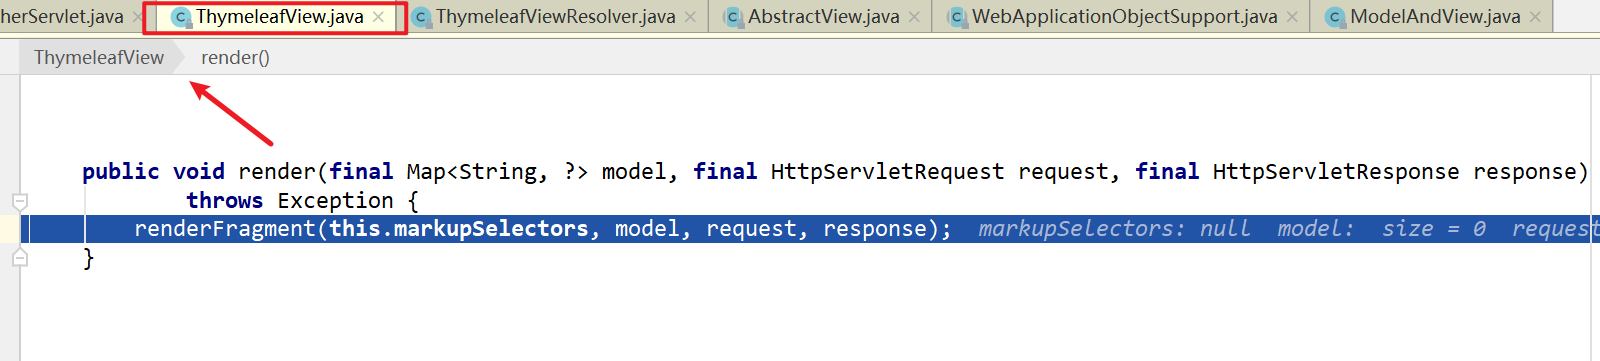
View是SpringMVC定义的一个视图接口,它表示被一个ViewResolver解析和初始化后将要执行的模板。
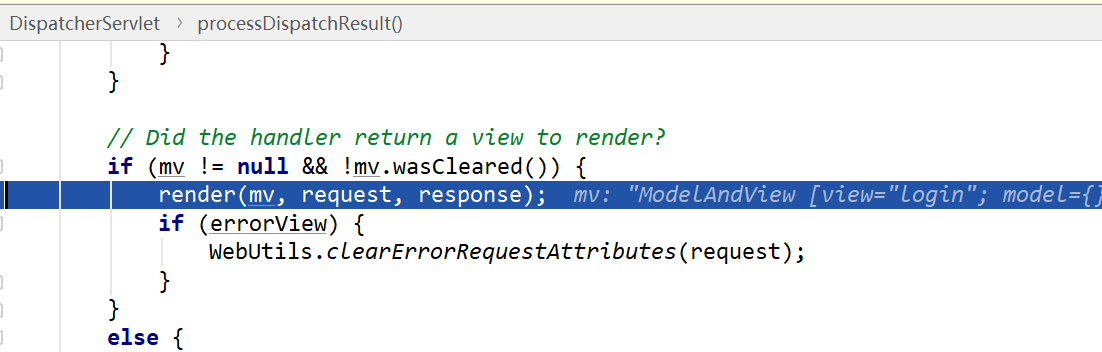
- 对于返回视图名的方法,ViewNameMethodReturnValueHandler对返回值进行处理后会返回一个ModelAndView对象mv,最终由给处理器适配器的handle()方法返回到doDispatch中

- 调用processDispatchResult()对mv进行处理

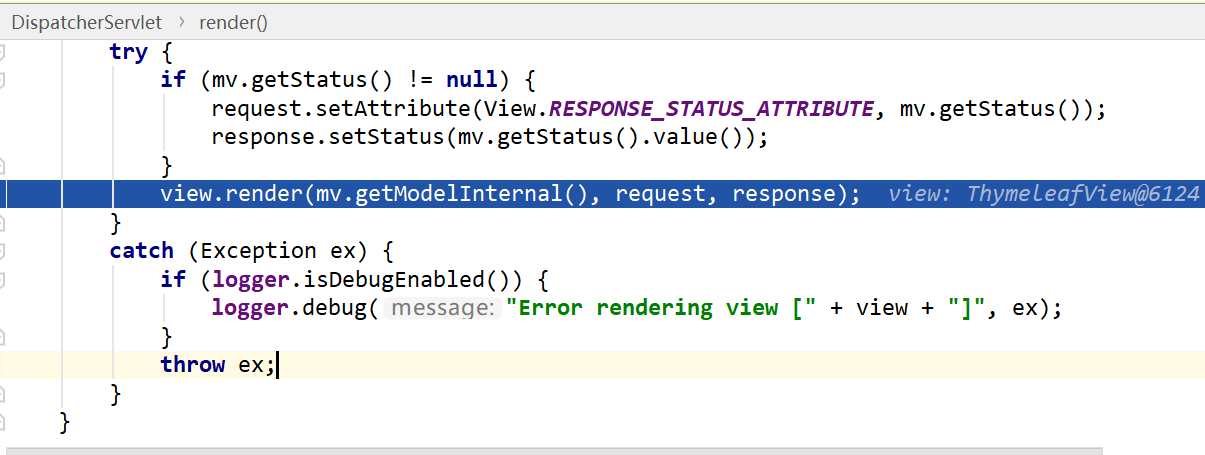
- render(mv,req,resp),对mv进行渲染处理,但只是一个逻辑,还没有真正执行视图渲染,因为此时。
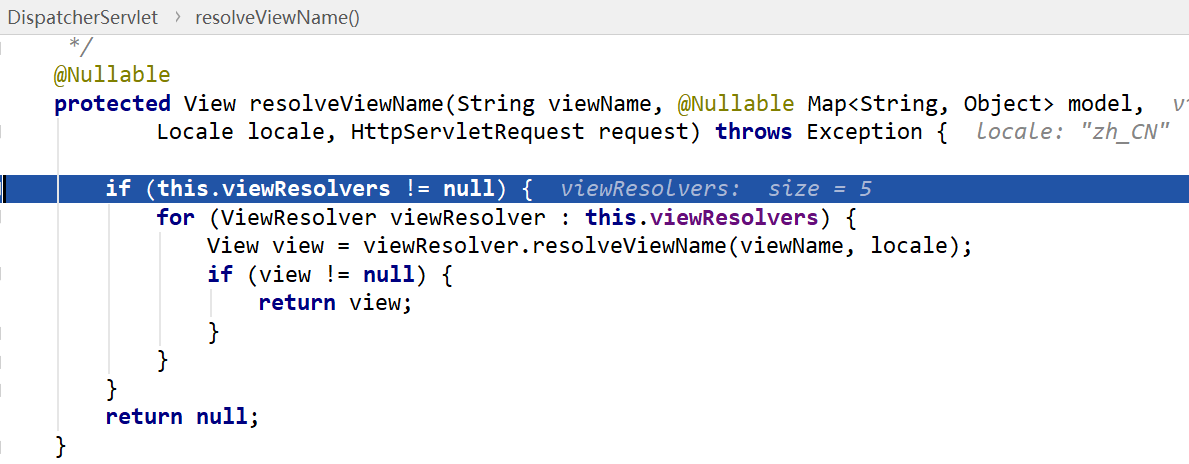
- resolveViewName(),根据视图名遍历所有的viewResolver,如果有一个视图解析器能正确解析出一个View对象,立即返回
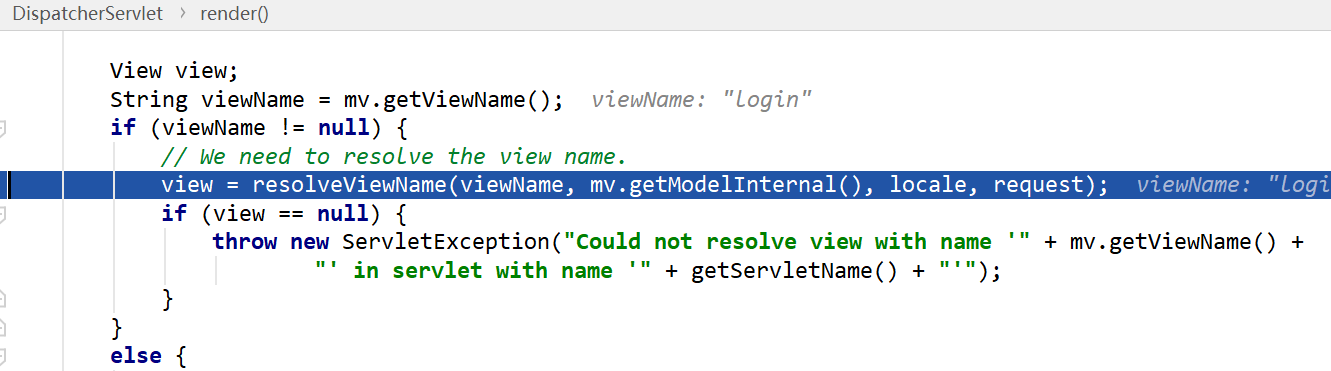
- 调用view.resolve(model,req,resp)进行真正的视图渲染,即把响应数据写到resp的过程。
1.6.7. 拦截器
SpringMVC的拦截器类似于javax.servlet.Filter,应用包括对访问资源做权限控制、统一视图控制、统一异常处理等。
1.6.7.1. 使用
这里以用来做访问控制的拦截器为例:当客户端未登录时,访问登录接口以及静态资源以外的资源都不会被拦截器放行。
- 创建拦截器类,继承HandlerInterceptor接口,重写方法
public class LoginInterceptor implements HandlerInterceptor { @Override public boolean preHandle(HttpServletRequest request, HttpServletResponse response, Object handler) throws Exception { Object loginUser = request.getSession().getAttribute("loginUser"); if(loginUser==null){ response.sendRedirect("/login"); return false; }else { return true; } } @Override public void postHandle(HttpServletRequest request, HttpServletResponse response, Object handler, ModelAndView modelAndView) throws Exception { } @Override public void afterCompletion(HttpServletRequest request, HttpServletResponse response, Object handler, Exception ex) throws Exception { } } - 注册拦截器
 @Configuration
 public class InterceptroConfig implements WebMvcConfigurer {
     @Override
     public void addInterceptors(InterceptorRegistry registry) {
         InterceptorRegistration interceptorRegistration = registry.addInterceptor(new LoginInterceptor());
         // /**会拦截所有资源,包括静态资源,需要排除
         String[] excludes = {
                 "/", "/login",
                 "/css/**",
                 "/images/**",
                 "/js/**",
                 "/fonts/**"
         };

         interceptorRegistration.
                 addPathPatterns("/**").
                 excludePathPatterns(excludes);

     }
 }
1.6.7.2. 原理
在DispatcherServlet.doDispatch()中会为请求获取一个HandlerExecutionChain对象,它包含一个当前可以处理当前请求的handler和一个拦截器集合。 拦截器的过程是这样的:
-
在执行请求方法前执行interceptor集合中每个拦截器的preHandle(),如果某个拦截器的preHandle返回false,直接触发afterCompletion()。HandlerExecutionChain中维护一个interceptorIndex,记录了当前preHandle()方法返回true的最后一个拦截器(意味着从第一个拦截器开始到interceptorIndex位置的拦截器,preHandle()都返回了true),从这个拦截器开始的afterCompletion()开始执行,一直执行到第一个拦截器的afterCompletion()。且拦截器链中只要有一个拦截器的preHandle()返回false,DispatchServlet的
doDispatch()会直接返回,不会执行请求的资源。 - 执行请求方法
- 执行请求方法之后执行interceptor集合中每个拦截器的postHandle(),从最后一个位置的拦截器开始往前执行每个拦截器的postHandle()
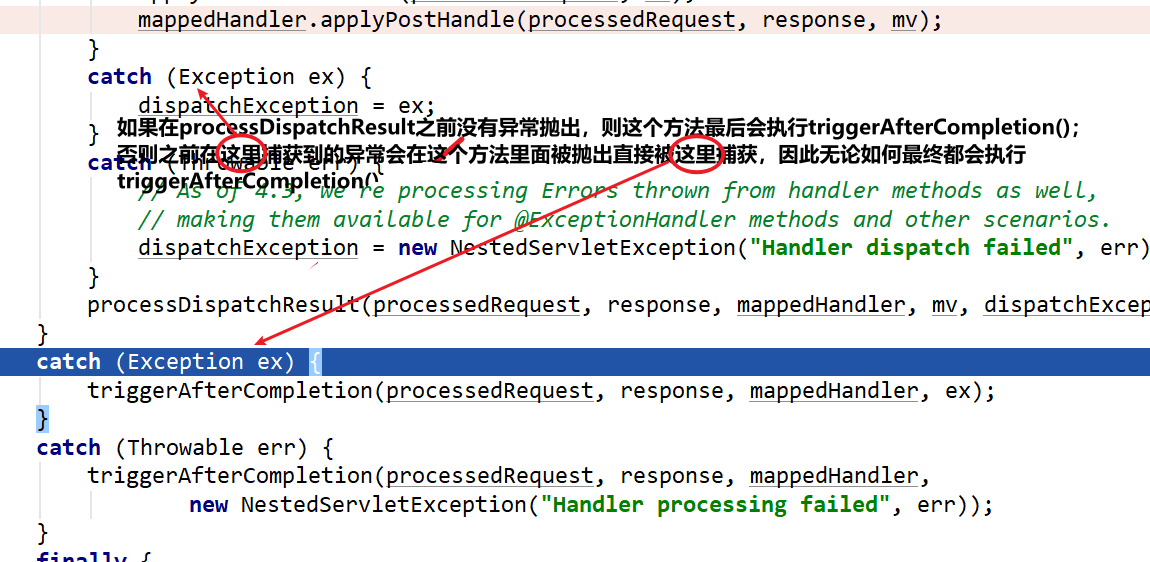
- 调用processDispatchResult()进行视图渲染,这个方法的最后会触发拦截器链的
triggerAfterCompletion()。
SpringMVC对异常的处理保证了HandlerExecutionChain的triggerAfterCompletion()方法一定会被执行。
1.6.8. 文件上传
1.6.8.1. 使用
服务端方法:
@PostMapping("/upload")
    public String upload(
            @RequestParam("email") String email,
            @RequestParam("username") String username,
            @RequestPart("headImg") MultipartFile headImg,
            @RequestPart("photos") MultipartFile[] photos
    ) throws IOException {

        log.info("email={},username={},headImg={} byte,photos={}",
                email,username,headImg.getSize(),photos.length);

//        文件保存
        if(headImg!=null&&!headImg.isEmpty()){
            headImg.transferTo(new File("D:\\temp\\"+headImg.getOriginalFilename()));
        }

        if(photos!=null){
            for(MultipartFile file:photos){
                file.transferTo(new File("D:\\temp\\"+file.getOriginalFilename()));
            }
        }
        return "index";
    }
客户端表单:
<form role="form" method="post" th:action="@{/upload}" enctype="multipart/form-data" >
    <div class="form-group">
        <label for="exampleInputEmail1">Email address</label>
        <input type="email" name="email" class="form-control" id="exampleInputEmail1" placeholder="Enter email">
    </div>
    <div class="form-group">
        <label for="exampleInputPassword1">Password</label>
        <input type="text" name="username" class="form-control" id="exampleInputPassword1" placeholder="Password">
    </div>
    <div class="form-group">
        <label for="exampleInputFile">File input</label>
        <input type="file" name="headImg" id="exampleInputFile" value="选择单个文件">
        <p class="help-block">Example block-level help text here.</p>
    </div>
    <div class="form-group">
        <label for="exampleInputFile">File input</label>
        <input type="file" name="photos" id="exampleInputFile_m" multiple value="选择多个文件">
        <p class="help-block">Example block-level help text here.</p>
    <
    <div class="checkbox">
        <label>
            <input type="checkbox"> Check me out
        </label>
    </div>
    <button type="submit" class="btn btn-primary">提交</button>
</form>
注意:
- 如果表单有文件上传,form的属性必须设置
enctype="multipart/form-data" - 给input设置属性
multiple可以选择多个文件
1.6.8.2. 原理
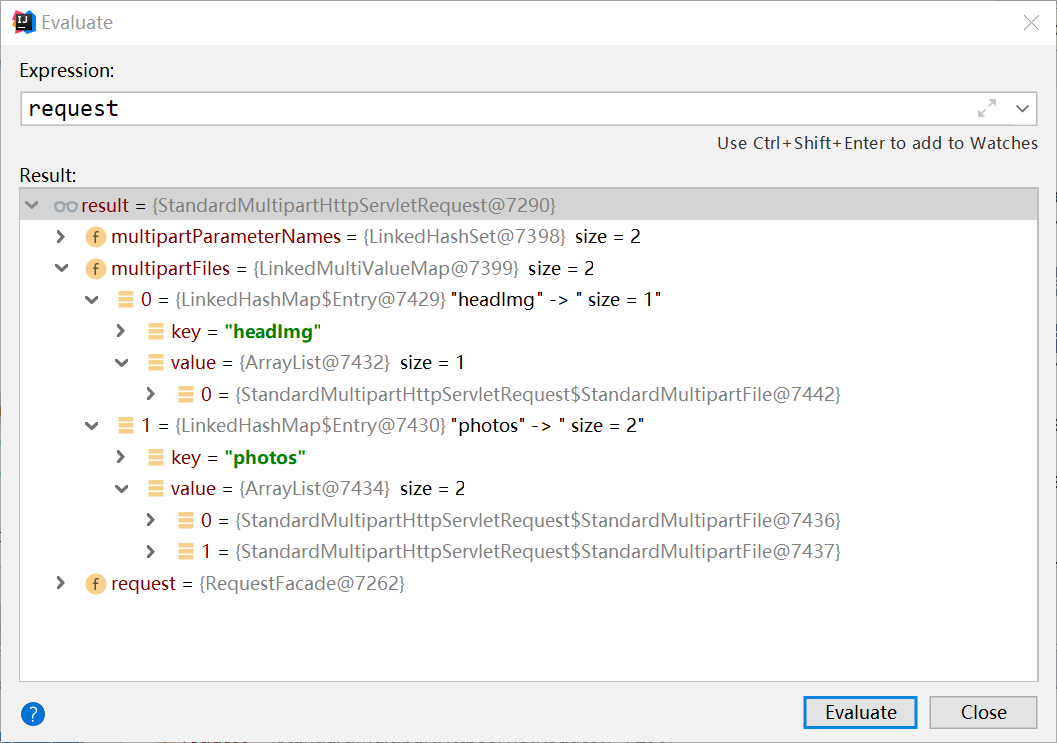
- doDispatch():调用checkMultipart对request进行检查,里面会调用multipartResolver对request进行解析,其实是将原始的request对象封装成一个StandardMultipartHttpServletRequest对象。这个对象封装了原始的request,将每一个参数文件分别封装为一个LinkedHashMap,这个map以文件参数名为key,value是一个ArrayList对象,里面存储的是StandardMultiFile对象,代表一个真是文件,如果客户端传过来的是多文件(参数名相同,有多个文件),那么ArrayList存储多个StandardMultiFile。
- 参数解析器解析、封装参数
- 调用目标方法
1.6.9. 异常处理
SpringMVC对Controller中未处理的异常有一个默认的处理流程:
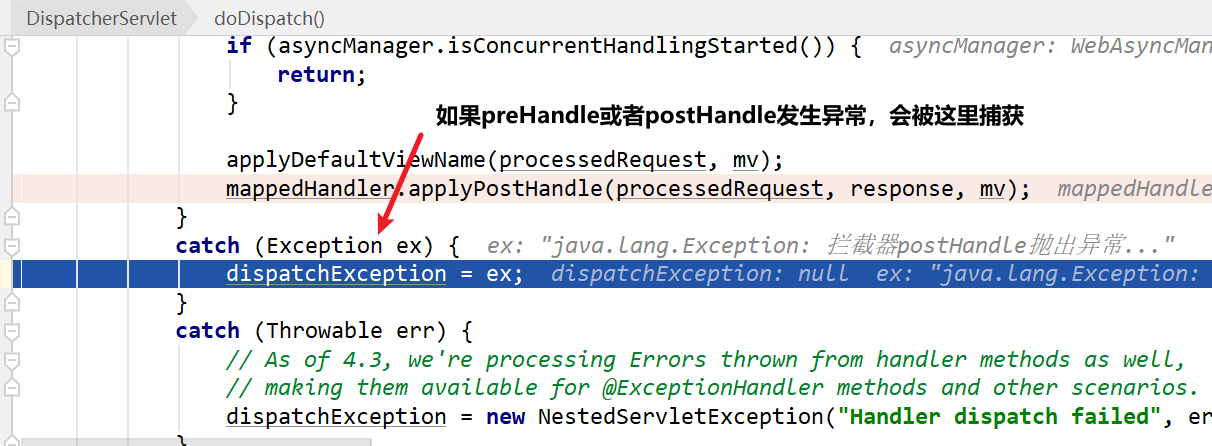
- 当Controller中的某个方法抛出异常,会被doDispatch()中的catch捕获,并用变量dispatchException维护这个异常对象。
- 随后调用processDispatchResult(req,resp,handler,mv,ex)方法,由于ex不为Null,随后进入异常处理,调用processHandlerException()方法。
- 在processHandlerException()中,会遍历一个DispatchServlet的一个属性叫handlerExceptionResolvers,它是一个ArrayList,有两个元素:DefaultErrorAttributes和HandlerExceptionResolverComposite,前者会将默认的错误信息设置到当前的request中并返回null;而后者顾名思义,是一个handlerExceptionResolver的复合类,它里面维护一个resolvers,默认是3个:
- ExceptionHandlerExceptionResolver:
- ResponseStatusExceptionResolver
- DefaultHandlerExceptionResolver
对hanlerExceptionResolvers中的元素进行遍历,调用resolver.resolveException(req,resp,handler,ex),返回一个、ModelAndView类型的exMV对象,如果有一个返回的exMV不为null,则processHandlerException()返回这个exMV随后这个exMV将会执行渲染操作;如果遍历所有的resolver都不能返回一个非空的exMV,则processHandlerException()将直接抛出这个ex。
- processHandlerException抛出异常后会被doDispatch()中外层的try-catch(Exception ex)捕获并调用triggerAfterCompletion(),直接将异常抛出,又会被catch(Throwable err)捕获并调用triggerAfterCompletion(),依然是将ex抛出,然后——doDispatch()方法抛出了异常。
- doDispatcher()抛出异常后,请求会转发到”/error”映射路径,最终由BasicErrorController的errorHtml()或者error()响应,区别是前者返回一个ModelAndView对象,后者返回请求体数据。
1.6.9.1. 全局异常处理
- 响应异常Result:@ControllerAdvice+@ExceptionHandler+@ResponseStatus
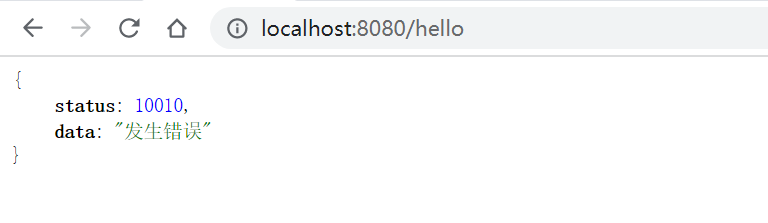
     /*
 自定义异常处理类@ControllerAdvice+@ExceptionHandler
 */
 @ControllerAdvice
 @ResponseBody
 public class GlobalExceptionHanlder {

     @ResponseStatus(HttpStatus.NOT_ACCEPTABLE)
     @ExceptionHandler(ArithmeticException.class)
     public ResultEntity handle(){

         ResultEntity resultEntity = new ResultEntity(10010, "发生错误");
         return resultEntity;
     }
 }
当@ExceptionHandler注解设置的异常被抛出后,会调用这个方法并返回执行结果。
@ResponseStatus不是必要的- handler方法签名是灵活的,返回值也有多种,具体请参照
@ExceptionHandler注解的源代码注释。
- 响应异常页面
 @Order(Ordered.HIGHEST_PRECEDENCE)//优先级
 @Component
 public class CustomExceptionViewHandler implements HandlerExceptionResolver {
     @Override
     public ModelAndView resolveException(HttpServletRequest request, HttpServletResponse response, Object handler, Exception ex) {


         //request参数其实携带了异常发生后DefaultErrorAttributes设置的一些属性,比如status(http响应状态码)、error(异常类型)、message等,
         //如果有需要也可以添加到模型中在视图中显示。
         if(ex instanceof RuntimeException){
             return new ModelAndView("error/404",new HashMap<>());
         }
         return null;
     }
 }
1.6.10. SpringMVC之原生web组件
原生web三大件:Servlet、Filter、Listener
1.6.10.1. Servlet
1.6.10.1.1. 使用
源码目录结构:
com
    └─hb
        └─admin
            ├─config
            ├─controller
            ├─exception
            ├─interceptor
            ├─model
            └─servlet
package com.hb.admin.servlet;

import javax.servlet.ServletException;
import javax.servlet.annotation.WebServlet;
import javax.servlet.http.HttpServlet;
import javax.servlet.http.HttpServletRequest;
import javax.servlet.http.HttpServletResponse;
import java.io.IOException;

@WebServlet(urlPatterns = "/servlet")
public class TestServlet extends HttpServlet {
    @Override
    protected void doGet(HttpServletRequest req, HttpServletResponse resp) throws ServletException, IOException {
        resp.getWriter().write("hello,Servlet!");
    }

    @Override
    protected void doPost(HttpServletRequest req, HttpServletResponse resp) throws ServletException, IOException {
        doGet(req, resp);

    }
}
@ServletComponentScan扫描web组件注解,包括@WebServlet、@WebFilter、@WebListener:
@ServletComponentScan(basePackages = "com.hb.admin")
@SpringBootApplication
public class BootAdminApplication {

    public static void main(String[] args) {
        SpringApplication.run(BootAdminApplication.class, args);
    }

}
1.6.10.2. Filter
package com.hb.admin.filter;


import lombok.extern.slf4j.Slf4j;

import javax.servlet.*;
import javax.servlet.annotation.WebFilter;
import javax.servlet.http.HttpFilter;
import java.io.IOException;

@Slf4j
@WebFilter(urlPatterns = {"/css/*","/image/*"})
public class TestFilter implements Filter {
    @Override
    public void init(FilterConfig filterConfig) throws ServletException {
        log.info("TestFilter init...");
    }

    @Override
    public void destroy() {
        log.info("TestFilter destroy...");

    }

    @Override
    public void doFilter(ServletRequest request, ServletResponse response, FilterChain chain) throws IOException, ServletException {
        log.info("TestFilter doFilter...");
        chain.doFilter(request,response);
    }
}
1.6.10.3. Listener
package com.hb.admin.listener;

import lombok.extern.slf4j.Slf4j;

import javax.servlet.ServletContextEvent;
import javax.servlet.ServletContextListener;
import javax.servlet.annotation.WebListener;


@Slf4j
@WebListener
public class TestListener implements ServletContextListener {
    @Override
    public void contextInitialized(ServletContextEvent sce) {
        log.info("context初始化完成...");
    }

    @Override
    public void contextDestroyed(ServletContextEvent sce) {
        log.info("context销毁...");
    }
}
1.7. boot使用jdbc
在boot项目中要使用jdbc访问关系型数据库,需要引入的依赖包括starter-jdbc和数据库对应的driver ,以Mysql数据库为例:
<dependency>
            <groupId>org.springframework.boot</groupId>
            <artifactId>spring-boot-starter-jdbc</artifactId>
        </dependency>

        <dependency>
            <groupId>mysql</groupId>
            <artifactId>mysql-connector-java</artifactId>
        </dependency>
在boot-dependencies中对mysql驱动版本做了管理,如果数据库版本和驱动版本不兼容,也可以自己手动指定驱动版本。
starter-jdbc引入的依赖包括spring-jdbc和HirakiCP数据库连接池,且在boot的自动配置中默认就是以hirakiCP作为默认的数据库连接池,如果要使用自定义的连接池,只需要引入相关依赖。 boot默认也配置了JdbcTemplate的bean,可以直接用JdbcTemplate操作数据库
1.7.1. 数据库连接参数配置
spring:
  datasource:
    driver-class-name: com.mysql.cj.jdbc.Driver
    username: root
    password: root
    url: jdbc:mysql://localhost:3306/db1?
1.7.2. 使用Druid连接池
Druid项目提供了boot starter依赖,自动装配数据源、监控组件(servlet和filter)等,只要在pom.xml中引入:
<dependency>
    <groupId>com.alibaba</groupId>
    <artifactId>druid-spring-boot-starter</artifactId>
    <version>1.1.10</version>
</dependency>
就可以使用Druid数据源了,且starter会自动装配,可以在application.yaml中自定义配置,具体配置参数参照druid starter自动装配的源码或者github主页。 数据库连接参数在spring.datasource下配置,另外的druid特有参数在spring.datasource.druid下配置。
例子:
spring:
  datasource:
    driver-class-name: com.mysql.cj.jdbc.Driver
    username: root
    password: root
    url: jdbc:mysql://localhost:3306/db1?
    druid:
      stat-view-servlet:
        enabled: true
        url-pattern: "/druid/*"
        login-username: admin
        login-password: admin123
1.7.3. boot项目使用Mybatis
Mybatis提供了Mybatis适配boot的starter以提供自动装配,在boot项目中使用Mybatis的步骤:
- 引入maven依赖
<dependency> <groupId>org.mybatis.spring.boot</groupId> <artifactId>mybatis-spring-boot-starter</artifactId> <version>2.1.1</version> </dependency> - 创建对应的Mapper接口和SQL语句映射的文件,将接口和SQL语句放在同名目录下。
- 在boot启动类上配置标注
@MapperScan(Mapper接口包路径),将Mapper注入Bean容器。 - mybatis全局配置文件可以使用外部XML配置文件,但mybatis-starter提供了配置类,可以直接在application.yaml中配置,具体配置见Mybatis 配置类。
- 如果要使用外部XML配置文件,配置
mybatis.configLocation,指定文件 - 如果在application.yaml中配置Mybatis的相关参数,配置mybatis.configuration下的参数。
上面两种方式是冲突的。
- 如果要使用外部XML配置文件,配置
1.7.4. boot项目中使用Redis
- 引入starter
<dependency> <groupId>org.springframework.boot</groupId> <artifactId>spring-boot-starter-data-redis</artifactId> </dependency> - 获取RedisTemplate实例,对Redis进行操作。
redis相关组件的自动装配是是boot官方自动配置包org.springframework.boot.autoconfigure.data.redis下完成的,spring对于Redis客户端的操作进行了封装,即RedisTemplate,但实际上进行操作的还是实际的客户端实现比如jedis或者lettuce,boot高版本是默认导入的Lettuce依赖即RedisTemplate默认是基于Lettuce的连接。
测试
-
自定义RedisTemplate ```java @Configuration public class RedisConfig {
@Bean public RedisTemplate<String, Object> redisTemplate(RedisConnectionFactory connectionFactory) { RedisTemplate<String, Object> redisTemplate = new RedisTemplate<>(); // 设置数据源 redisTemplate.setConnectionFactory(connectionFactory);
 redisTemplate.setKeySerializer(RedisSerializer.string());
 redisTemplate.setValueSerializer(RedisSerializer.json());

 redisTemplate.setHashKeySerializer(RedisSerializer.string());
 redisTemplate.setHashValueSerializer(RedisSerializer.json());

 redisTemplate.afterPropertiesSet();

 return redisTemplate;  } }
2. 测试
```java
@SpringBootTest(classes = NowcoderForumApplication.class)
public class RedisTest {

	@Resource
	private RedisTemplate<String, Object> redisTemplate;

	@Test
	public void testString() throws Exception {
		String key = "test:count";
		redisTemplate.opsForValue().set(key, 1);

		Object value = redisTemplate.opsForValue().get(key);
		System.out.println(value);

		Long increment = redisTemplate.opsForValue().increment(key);
		System.out.println(increment);

		Long decrement = redisTemplate.opsForValue().decrement(key);
		System.out.println(decrement);

	}

	@Test
	public void testHash() throws Exception {
		HashOperations<String, Object, Object> opsForHash = redisTemplate.opsForHash();

		String key = "test:user";
		opsForHash.put(key, "id", 11111);
		opsForHash.put(key, "username", "Tom");
		opsForHash.put(key, "age", 23);

		Object value = opsForHash.get(key, "age");

		System.out.println(value);
	}

	@Test
	public void testList() throws Exception {

		System.in.read();

		String key = "test:ids";
		ListOperations<String, Object> opsForList = redisTemplate.opsForList();
		opsForList.leftPush(key, 1);
		opsForList.leftPush(key, 2);
		opsForList.leftPush(key, 3);
		opsForList.leftPush(key, 4);
		opsForList.leftPush(key, 5);

		Long size = opsForList.size(key);
		System.out.println("size:" + size);

		System.out.println(opsForList.index(key, 0));
		List<Object> list = opsForList.range(key, 0, 100);
		System.out.println(list);

		System.out.println(opsForList.rightPop(key));
		System.out.println(opsForList.rightPop(key));
		System.out.println(opsForList.rightPop(key));
	}

	@Test
	public void testSet() throws Exception {
		SetOperations<String, Object> opsForSet = redisTemplate.opsForSet();


		String key="test:teachers";
		opsForSet.add(key, "段誉","乔峰","阿紫","虚竹","天山童姥");
		Set<Object> members = opsForSet.members(key);
		System.out.println(members);


		System.out.println(opsForSet.randomMember(key));

	}

	@Test
	public void testZset() throws Exception {
		ZSetOperations<String, Object> opsForZSet = redisTemplate.opsForZSet();

		String key="test:students";

		opsForZSet.add(key, "张三", 90.0);
		opsForZSet.add(key, "李四", 10.0);
		opsForZSet.add(key, "王五", 30.0);
		opsForZSet.add(key, "赵六", 100.0);
		opsForZSet.add(key, "钱七", 70.0);


		Set<Object> teachers = opsForZSet.range(key, 0, -1);
		System.out.println(teachers);//[李四, 王五, 钱七, 张三, 赵六]

		Set<TypedTuple<Object>> rangeWithScores = opsForZSet.rangeWithScores(key, 0, -1);
		System.out.println(rangeWithScores);

		Set<Object> reverseRange = opsForZSet.reverseRange(key, 0, -1);
		System.out.println(reverseRange);//[赵六, 张三, 钱七, 王五, 李四]

	}
}
1.7.5. 环境切换
springboot提供了方便的环境切换功能,所谓的环境切换就是当springboot运行在不同环境下的时候要更改相关的参数配置,比如开发环境和生产环境的springboot服务相关参数也许很多都不同,如果要手动更改这些参数十分麻烦。
可以实现准备每种环境各自的配置文件,然后通过设置参数spring.profiles.active=${profile}的值来指定项目从哪个配置文件下读取参数。
注意:配置文件的命名应该以application-${profile}.yaml(properties)为格式。
1.7.5.1. 例子
项目中有四份配置文件,分别是开发环境、生产环境、测试环境和默认环境。 application-dev.yaml server: port: 8080 application-prod.yaml server: port: 8081 application-test.yaml server: port: 8082
application.yaml spring.profiles.active=prod
当boot项目启动时,会加载默认的application.yaml配置文件,且因为spring.profiles.active=prod,也会加载application-prod.yaml,且冲突的参数以后者为准。
当boot项目打包成jar包运行,可以通过命令行参数更改spring.profiles.active的值,比如:
java -jar jar包文件名 --spring.profiles.active=dev就会以dev环境启动。
@Profile:用于标注了@Component或@Configuration的类和标注了@Bean的方法,指示了相关的Bean只有在特定的环境下才会被实例化放入容器。
boot项目的配置文件还可以放在jar包外面,更改配置时修改配置文件不需要重新打包。 更多boot外部化配置参照: https://docs.spring.io/spring-boot/docs/current/reference/html/features.html#features.external-config.files
1.8. 日志
logback-spring.xml文件模板:
<?xml version="1.0" encoding="UTF-8"?>
<configuration>
    <contextName>nowcoder</contextName>
    <!-- 日志的目录 -->
    <property name="LOG_PATH" value="D:/logs"/>
    <!-- 应用的目录-->
    <property name="APPDIR" value="nowcoder"/>

    <!-- error file -->
    <appender name="FILE_ERROR" class="ch.qos.logback.core.rolling.RollingFileAppender">
        <file>${LOG_PATH}/${APPDIR}/log_error.log</file>
        <rollingPolicy class="ch.qos.logback.core.rolling.TimeBasedRollingPolicy">
            <fileNamePattern>${LOG_PATH}/${APPDIR}/error/log-error-%d{yyyy-MM-dd}.%i.log</fileNamePattern>
            <timeBasedFileNamingAndTriggeringPolicy class="ch.qos.logback.core.rolling.SizeAndTimeBasedFNATP">
                <maxFileSize>5MB</maxFileSize>
            </timeBasedFileNamingAndTriggeringPolicy>
            <maxHistory>30</maxHistory>
        </rollingPolicy>
        <append>true</append>
        <encoder class="ch.qos.logback.classic.encoder.PatternLayoutEncoder">
            <pattern>%d %level [%thread] %logger{10} [%file:%line] %msg%n</pattern>
            <charset>utf-8</charset>
        </encoder>
        <filter class="ch.qos.logback.classic.filter.LevelFilter">
            <level>error</level>
            <onMatch>ACCEPT</onMatch>
            <onMismatch>DENY</onMismatch>
        </filter>
    </appender>

    <!-- warn file -->
    <appender name="FILE_WARN" class="ch.qos.logback.core.rolling.RollingFileAppender">
        <file>${LOG_PATH}/${APPDIR}/log_warn.log</file>
        <rollingPolicy class="ch.qos.logback.core.rolling.TimeBasedRollingPolicy">
            <fileNamePattern>${LOG_PATH}/${APPDIR}/warn/log-warn-%d{yyyy-MM-dd}.%i.log</fileNamePattern>
            <timeBasedFileNamingAndTriggeringPolicy class="ch.qos.logback.core.rolling.SizeAndTimeBasedFNATP">
                <maxFileSize>5MB</maxFileSize>
            </timeBasedFileNamingAndTriggeringPolicy>
            <maxHistory>30</maxHistory>
        </rollingPolicy>
        <append>true</append>
        <encoder class="ch.qos.logback.classic.encoder.PatternLayoutEncoder">
            <pattern>%d %level [%thread] %logger{10} [%file:%line] %msg%n</pattern>
            <charset>utf-8</charset>
        </encoder>
        <filter class="ch.qos.logback.classic.filter.LevelFilter">
            <level>warn</level>
            <onMatch>ACCEPT</onMatch>
            <onMismatch>DENY</onMismatch>
        </filter>
    </appender>

    <!-- info file -->
    <appender name="FILE_INFO" class="ch.qos.logback.core.rolling.RollingFileAppender">
        <file>${LOG_PATH}/${APPDIR}/log_info.log</file>
        <rollingPolicy class="ch.qos.logback.core.rolling.TimeBasedRollingPolicy">
            <fileNamePattern>${LOG_PATH}/${APPDIR}/info/log-info-%d{yyyy-MM-dd}.%i.log</fileNamePattern>
            <timeBasedFileNamingAndTriggeringPolicy class="ch.qos.logback.core.rolling.SizeAndTimeBasedFNATP">
                <maxFileSize>5MB</maxFileSize>
            </timeBasedFileNamingAndTriggeringPolicy>
            <maxHistory>30</maxHistory>
        </rollingPolicy>
        <append>true</append>
        <encoder class="ch.qos.logback.classic.encoder.PatternLayoutEncoder">
            <pattern>%d %level [%thread] %logger{10} [%file:%line] %msg%n</pattern>
            <charset>utf-8</charset>
        </encoder>
        <filter class="ch.qos.logback.classic.filter.LevelFilter">
            <level>info</level>
            <onMatch>ACCEPT</onMatch>
            <onMismatch>DENY</onMismatch>
        </filter>
    </appender>

    <!-- console -->
    <appender name="STDOUT" class="ch.qos.logback.core.ConsoleAppender">
        <encoder>
            <pattern>%d %level [%thread] %logger{10} [%file:%line] %msg%n</pattern>
            <charset>utf-8</charset>
        </encoder>
        <filter class="ch.qos.logback.classic.filter.ThresholdFilter">
            <level>debug</level>
        </filter>
    </appender>


    <logger name="com.hb" level="debug"/>

    <root level="info">
        <appender-ref ref="FILE_ERROR"/>
        <appender-ref ref="FILE_WARN"/>
        <appender-ref ref="FILE_INFO"/>
        <appender-ref ref="STDOUT"/>
    </root>

</configuration>